
Everyone, welcome back. Today we will cover Python web application frameworks such as Flask and Django with all the important details along with practical code examples. We will first start with learning the Python package manager, setting up and installing libraries in a virtual environment, and all the do’s and don’ts. We will cover this in detail. Next, we will learn the basics of the Flask framework, its structure, and a basic introduction, and at the end, we will create and deploy a simple “Hello World” Flask web application on localhost. Next, we will move on to another powerful Python web framework, which is Django. We will cover all the basics of Django as well, such as how to create a project, how to create apps, the basic file structure, how Django templates work, how static files work, how to link files, where to write which code, etc., along with, at the end, a simple fully functional Django-based demo web application. Before starting, I want to make sure of two things as expectations. First, our goal is to write secure code, but we won’t go too deep into building complex applications. We will focus on understanding the code structure and basic code writing so that we can read, understand, and analyze how each part of the code works. This will help us identify and replace insecure code.
The second thing is that we will not learn FastAPI. We will introduce you to flask a little bit but not too much. The reason is that later in this course, we will be working with Django-based applications and their code analysis, not Flask applications. Also, I don’t have experience with FastAPI, so I cant cover it here, but it’s not important for our current focus since we will be working with Django web applications.
Okay, so let’s start!
Packages and Modules
In Python, when you write code, you often import modules like os, math, and random. These are part of Python’s standard library, which means they come built-in and don’t need to be installed. However, sometimes we need external packages or libraries that help us write code, or when running a pre-built tool that depends on external packages, we must install those packages first, otherwise, the tool won’t run properly. For example, you might need a library to make HTTP requests, install Flask or Django for web application development, perform cryptography, or work on ethical hacking and networking tasks. In such cases, we need to install external packages.
Now, let’s learn how to work with these packages and explore the best approach to manage them.
Python Package Manager!!
Pip is a popular Python package manager that we use to install, update, or uninstall third-party libraries. It works similarly to package managers like apt, snap, or pacman on Linux systems, which are used to install, update, or remove binaries.
In the same way, Python uses pip to manage packages and dependencies. Let’s say we want to write code that uses a third-party library, for example, flask. We might write import flask, but if it’s not installed on our system, we will get a ModuleNotFoundError. Why? Because the system can’t find the package. To fix that, we need to install it using pip:
pip install flask
Alternatively, you can manually download the package from the Python Package Index (PyPI), which is also quite simple.
Additionally, if you want to install a specific version of a module, like in the case of flask, you can do it like this:
pip install flask==1.5
You can also uninstall any package using the command:
pip uninstall flask
To check what’s already installed in your system, use this command:
pip lists
It will list all the installed packages.
Or you can use:
pip freeze
This will display the packages in a simpler, plain format.
Why would you need this? Sometimes, for specific applications or tools, you may need an older version of a package for compatibility or testing reasons. In such cases, you can install that version and also include it in a requirements.txt file so others running your tool can install the same version easily. However, you need to be careful, if you have both a new and an old version of the same package installed, it can cause conflicts. By default, Python will use the latest version. To avoid this problem, we use a virtual environment, which isolates dependencies for different projects. We will learn about this next in this post.
Working with Virtual Environments
Now let’s talk about one of the most essential tools in Python: the virtual environment. A virtual environment is like a small, isolated Python setup within your system. It keeps your project’s packages separate from the global ones, which is crucial when working on multiple projects that require different versions of the same library. For example, imagine one project requires Flask 2.0 while another needs Flask 3.0. Without isolation, these versions would conflict and cause errors. Virtual environments solve this problem by keeping dependencies separated. Tools like venv, conda, or uv help us create and manage virtual environments without affecting what’s installed globally on the system.
Setting Up a Virtual Environment
Let’s go step by step in the terminal. First, install the venv tool:
pip install venv
There are many tools such as uv and venv, both work the same, but here we will use venv:
# Create a project directory
mkdir FlaskApp
cd FlaskApp

# Create a new virtual environment
python3 -m venv env
If venv is not already installed, use this command:
sudo apt install python3 python3-venv -y
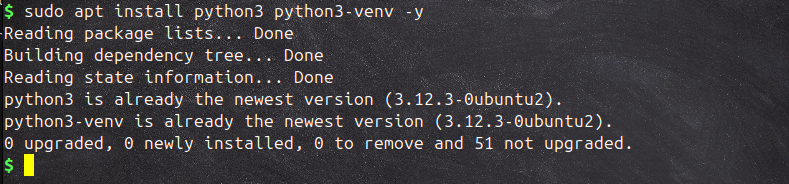
Run the above command again to create the virtual environment:
python3 -m venv env
You will now have a folder named env inside your project root directory. This contains its own Python interpreter and pip.
Next, we need to activate it: On Linux/macOS terminal, in the same FlaskApp directory:
source env/bin/activate
On Windows, inside VS Code’s built-in terminal:
.\env\Scripts\activate.ps1
Once activated, your terminal will show (env) at the start of the line.
 Now, any library or module you install will work inside this environment only, not globally. But first, I want you to compare some packages and versions from the virtual environment with the global one for better understanding.
Run this command to see which Python version is being used:
which python
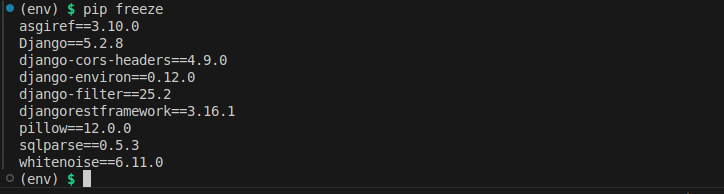
The command below will list all installed packages and libraries. If you have not installed any yet, it will return an empty response:
pip freeze
 Now, you can install any library or package without creating conflicts with the ones used globally. The benefit is that one project’s risky or experimental library won’t affect another. You can also test updates or new versions safely without breaking your main setup, and you can remove virtual environments without affecting the system Python. So, always use a virtual environment for new projects.
Once you are done, you can deactivate it using:
deactivate
You can verify where Python is running from:
which python3
You will see it points to your global environment folder instead of the local path, since we have deactivated the virtual environment.
 On Windows, use:
where python
The same steps work in VS Code’s integrated terminal, it behaves exactly the same.
When you want to share your project as open source or someone else wants to run it on their system, they will need all the installed packages and libraries. How will they know which ones to install? The solution is the requirements.txt file. While building a project, you install many external libraries, and requirements.txt stores all these packages with their versions so others can run the project without errors. We will learn how to create and use a requirements.txt file in Python and why it’s useful.
Write requirements.txt File
Imagine you are writing a script that depends on flask. If you just tell someone “just install flask,” they might install a newer or older version than the one you used, which could break the tool or cause problems. We need to solve this issue before sharing the project. Whenever you build a tool that contains third-party libraries or code, you must create a requirements.txt file. In this file, you list all the modules or packages along with their versions. This ensures that anyone using your tool installs the same versions you used, avoiding compatibility issues. So, whenever you create a script or project, always include a requirements.txt file with all the libraries and their versions that you want others to use. Now, if you are creating a tool that uses external packages or libraries and want others to run it exactly like you do, you need to make it easy for them. Writing a requirements.txt file is the way to do this.
Suppose we created a tool called FlaskApp. The following is its structure:
FlaskApp/
├── App.py
└── requirements.txt
The FlaskApp.py file contains all our code, where we have also imported one external package, flask:
import os             #-> from python standard library so no need of installation
import flask       #-> external library - need installation
Now, if you want to publish your project so anyone can run it without package or version issues, you need a requirements.txt file. In this file, write the module names along with their versions using this format:
flask==1.5.0
python-dotenv==1.0.0
You can find the exact format by using this command and then copy-pasting it into the .txt file. If you have many packages, you can generate the file automatically using:
pip freeze > requirements.txt # it will list all the installed packages and libraries
 This will list all installed packages and libraries with their versions.
Now that you have saved all packages with versions in requirements.txt, anyone who wants to run your tool can first install all required packages by running:
pip install -r requirements.txt
What About the --break-system-packages Error?
Sometimes, when you try to install something globally (especially on Linux with system-managed Python), pip may show:
error: externally-managed-environment
and suggest using --break-system-packages. This happens because modern systems protect the global Python installation. Installing packages directly into the system Python can break system tools that depend on it.
Should you use --break-system-packages?
No, not unless you fully understand the risks. The correct approach is to use a virtual environment instead. That’s exactly what it’s made for, safe, isolated installations. This was important to understand before moving on to some live projects where we will need these skills. Now, let’s move to our next topic.
Flask
Flask has two major components, Werkzeug and Jinja2. While Werkzeug is responsible for providing routing, debugging, and Web Server Gateway Interface (WSGI), Flask leverages Jinja2 as template engine. Natively, Flask does not support database access, user authentication, or any other high-level utility, but it does provide support for extensions integration to add all such functionalities, making Flask a micro- yet production-ready framework for developing web applications and services. A simple Flask application can fit into a single Python file or it can be modularized to create a production-ready application. The idea behind Flask is to build a good foundation for all applications leaving everything else on extensions. Flask community is quite big and active with hundreds of open source extensions. The Flask core team continuously reviews extensions and ensures approved extensions are compatible with the future releases. Flask being a microframework provides flexibility to the developers to choose the design decisions appropriate to their project. It maintains a registry of extensions which is regularly updated and continuously maintained.
First Flask Program
Before writing a simple Flask program, we first need to install the flask library using pip or any other package manager. First, open VS Code in your project directory (or any code editor you are following). Next, enter the directory, create a virtual environment, and activate it. After that, install the Flask library using:
from flask import Flask
app = Flask(__name__)

@app.route('/')
def greet():
    return "hello world"

if __name__ == '__main__':
    app.run(debug=True)
To explain the above code: at the start, we are importing the Flask class from the Flask library. Next, app = Flask(__name__) creates an object of the Flask class. @app.route('/') is a decorator that tells Flask which URL should trigger the function. def greet(): defines the function that is called when that URL is accessed. return "hello world" is the response sent from that URL. app.run(debug=True) runs the app on a local development server. The debug=True argument allows any Python errors to appear on the web page and is also important for live updates. By live updates, I mean that whenever we make changes in the code, it automatically updates on the web, and any errors are shown transparently. We can also pass additional parameters like port and IP address if we want to deploy it publicly. But since we are hosting it locally, it defaults to http://localhost:5000. Now we need to run this app using simple python3 followed by python file:
python3 app.py
If it is running without any errors, it will provide us a localhost link to see the output of the app. Or, we can simply open any browser and go to http://localhost:5000. Once we open it, we will be at the / root, as we defined in the code with the decorator @app.route('/'). This is the default URL. But if we want to create additional links dynamically, we can do the same as before:
 Perfect, our simple “Hello World” Flask app is working fine.
Templates
Flask uses Jinja2 as its template engine. A template is a file that contains static data as well as placeholders for dynamic data. A Flask route can render a template and return it to the client. First, create a directory named templates in your main application directory. Inside this directory, create an HTML file named index.html and add the following content:
<h1>Hello {{ name }}!</h1>
Render the Template in your Flask app:
from flask import render_template

@app.route('/hello/<name>')
def hello(name=None):
    return render_template('index.html', name=name)
The render_template function takes the name of a template file and a variable list of template arguments, and it returns the same template with all placeholders replaced by actual values. Flask applications are easy to debug with the built-in development server. When you run the application with app.run(debug=True), Flask provides an interactive debugger in the browser if your app encounters any errors. Flask gives you everything you need to build APIs, web apps, or even learn backend development with minimal setup and preparation. Make sure you have created a folder named templates and, inside it, a file named index.html. Then save this code in an app.py file:
from flask import Flask, render_template

app = Flask(__name__)

@app.route('/hello/<name>')
def hello(name=None):
    return render_template('index.html', name=name)


if __name__ == '__main__':
    app.run(debug=True)
Save the file and run it in the browser using the link: http://localhost:5000/hello/PutNameHere

Professional Development with Flask
But if you are serious and want to do professional development, we need to modularize project files. We don’t run all the code in a single Python file. As a good practice, a well-organized project structure is crucial for maintaining the codebase as the application grows.
A typical structure for a Flask project looks like this:
/app: This directory contains your application code.__init__.py: Initializes your Flask app and brings together other components.views.py: Contains routes and views for your application.models.py: Contains the database models./static: Holds static files like JavaScript, CSS, and images./templates: Contains the Jinja2 templates./venv: Directory for the virtual environment.requirements.txt: Lists all of your application’s dependencies.config.py: Contains configuration variables and settings.run.py: The entry point for running your application.
Install Flask
Begin by ensuring Flask is installed in your Python environment. As learned previously, you can install Flask using pip:
pip install Flask
Create Flask Application
In the __init__.py file, set up your Flask application:
from flask import Flask
app = Flask(__name__)
from app import views
This script initializes the Flask application object as app. The app will import the views from your application, which you will define in views.py.
Create Simple View
In views.py, define a simple route:
from app import app

@app.route('/')
def index():
    return "Hello Flask!"
Managing Dependencies with Pip
To handle project dependencies efficiently, maintain a requirements.txt file. Whenever you install a new package, update this file:
pip freeze > requirements.txt
This file allows anyone setting up the project to easily install all required dependencies using:
pip install -r requirements.txt
Configuring Flask App
Configuration settings help you manage different environments (development, testing, production) more effectively.
Create Configuration File
Set up a config.py file to store configuration settings. This can include database URLs, secret keys, API keys, and other environment-specific settings:
import os

class Config(object):
    SECRET_KEY = os.environ.get('SECRET_KEY')
    DEBUG = False
    TESTING = False

class ProductionConfig(Config):
    DATABASE_URI = 'mysql://user@localhost/foo'

class DevelopmentConfig(Config):
    DEBUG = True
    DATABASE_URI = 'sqlite:///development.db'

class TestingConfig(Config):
    TESTING = True
    DATABASE_URI = 'sqlite:///testing.db'
Load Configuration
In your __init__.py, configure your app to use these settings based on the current environment:
app.config.from_object('config.DevelopmentConfig')
Running the Flask Application
To run the Flask application, you can use the Flask command line or create a script.
Flask Command Line
Set environment variables to tell Flask how to import your app, then run it:
export FLASK_APP=run.py
export FLASK_ENV=development
flask run
Or run your application directly using:
python run.py
By keeping the project organized, managing dependencies carefully, and using configurations effectively, you can ensure a smooth development process and make your application ready to handle different environments.
Here you can see all my files (ignore the resources directory).

Alright, we have successfully developed our first Flask web application while following professional development practices. There is much more you can do with Flask, such as creating dynamic routes, managing routes, building URLs, handling HTTP methods, error handling, working with templates, file handling, database integration, managing authentication and authorization, implementing security practices, improving performance, and much more. It is a really powerful framework for web development.
Django
Django (pronounced “Jango,” the “d” is silent) is another powerful Python web application framework. Django is free and open source, written in Python, and follows the Model-View-Template (MVT) architectural pattern. It is maintained by the Django Software Foundation (DSF) and is used by many top websites, including YouTube, Google, Dropbox, Yahoo Maps, Mozilla, Instagram, Washington Times, NASA, and more https://www.shuup.com/blog/25-of-the-most-popular-python-and-django-websites/.
Django was created in 2003 as an internal project at the Lawrence Journal-World News to improve their web development process. The original authors are Adrian Holovaty and Simon Willison. After testing the framework under heavy traffic, it was released to the public as an open-source framework on July 21, 2005. Django was named in memory of the guitarist Django Reinhardt. Official website: https://www.djangoproject.com/.
Top 5 Features of Django Framework
Django was created to meet fast-moving newsroom deadlines while satisfying the requirements of experienced web developers. Its main features include:
- Fast: Django helps developers take applications from concept to completion as quickly as possible.
- Fully loaded: Django includes many built-in tools for common web development tasks, including user authentication, content administration, site maps, RSS feeds, and more.
- Security: Django prioritizes security and helps developers avoid common vulnerabilities like SQL injection, cross-site scripting, cross-site request forgery, and clickjacking. Its authentication system securely manages user accounts and passwords.
- Scalability: Some of the busiest sites in the world use Django’s ability to scale quickly and flexibly to handle high traffic.
- Versatile: Django has been used to build a wide range of applications, from content management systems to social networks and scientific computing platforms.
Development of Our First Django Web Application
How to install Django:
- Make sure Python is already installed on your system:
python --version
- Install Django using pip:
pip install django
- To check the Django version:
python -m django --version
The latest version is 5.2.8.
Django Project vs Django Application
A Django project is a collection of applications and configurations that form a complete web application (e.g., a Bank Project). A Django application is responsible for performing a specific task within the project, such as a loan app, registration app, polling app, etc.
How to Create a Django Project
Once Django is installed on your system, you get the django-admin command-line tool, which can be used to create a Django project:
django-admin startproject firstProject
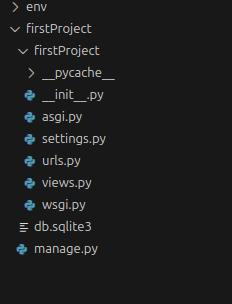
After running the above command, the following project structure will be created:
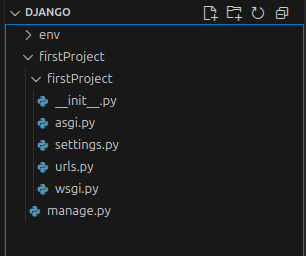 Now, we can also create and add more files such as
 views.py, models.py, and any others as needed. Let’s understand the role of each file:
init.py
This is a blank Python script. Because of this special file name, Django treats the folder as a Python package.
settings.py
This file contains all the project settings and configurations, such as installed applications, middleware configurations, database settings, and more.
urls.py
This file stores all the URL patterns for the project. For every view (web page), a separate URL pattern is defined. End users can use these patterns to access the web pages.
wsgi.py
WSGI stands for Web Server Gateway Interface. It is a protocol that acts as an interface between the web application and the web server. This file is used when deploying the application to a production server.
manage.py
This is the most commonly used Python script. It is a command-line utility to interact with the Django project in various ways, such as running the development server, running tests, creating migrations, and more.
models.py
This file stores all the database models.
views.py
This controls all the functionalities or business logic. We can return the output of views from here.
How to Run the Django Development Server
First, navigate to your main project directory and make sure the manage.py file is present. Then, execute the following command:
python3 manage.py runserver
If you see the Django welcome page in your browser, it means the project code is working fine.

Let’s Do More in Development!!
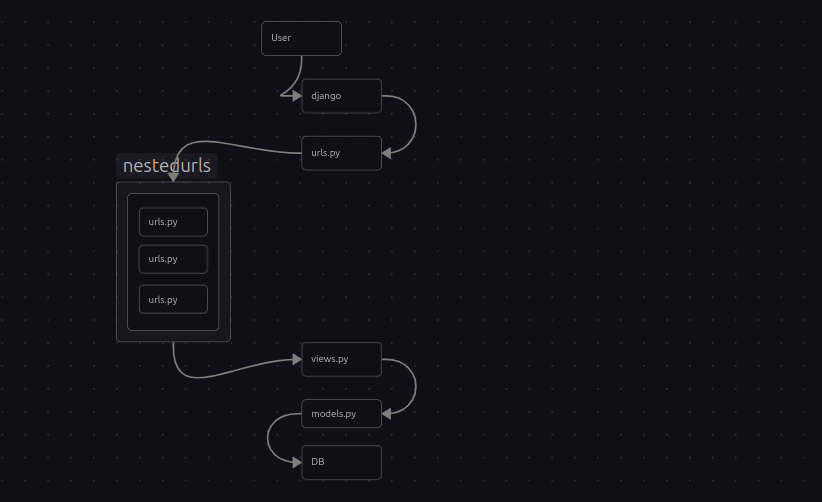
Our simple Django web application is ready, but that’s not enough. Now we need to add more features, pages, and a lot of backend functionality. Let’s understand this by writing more code and adding more files while following the default structure that Django auto-generated. First, let’s understand how Django works in the backend, from the user to the final web application, using this structure:
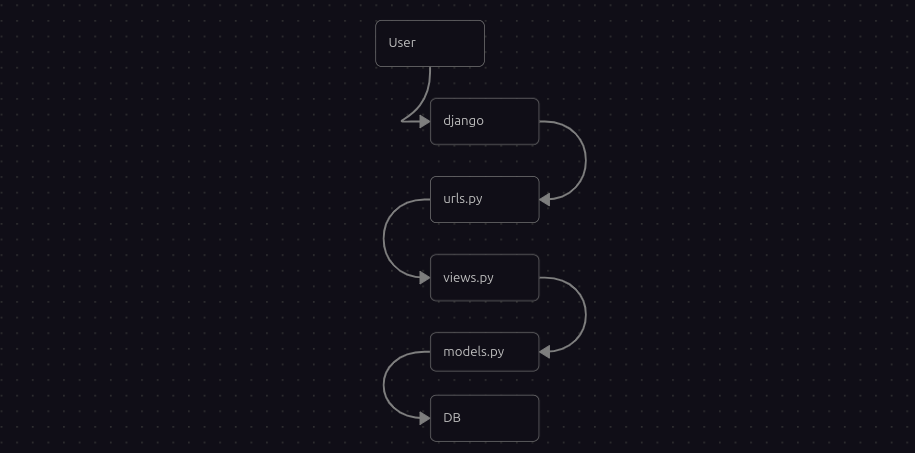
Views can send back a response in many ways, either by running their own logic or by fetching data from the database.
We will be writing this logic in the views.py file. The auto-generated Django files and folder structure do not include views.py or some other files by default, but we can create it manually and write our code. Once done, we will link views.py to urls.py so that whenever a user makes a request, it first goes to urls.py. This file will then route the request to the appropriate function or logic in views.py and return a response to the user.
Looking at the structure, we have added a views.py file. Make sure to add it inside the subdirectory of firstProject.
firstProject/
├── db.sqlite3
├── firstProject
│   ├── asgi.py
│   ├── __init__.py
│   ├── __pycache__
│   ├── settings.py
│   ├── urls.py
│   ├── views.py
│   └── wsgi.py
└── manage.py
file and folder structure:
Let’s write the views.py file.
from django.http import HttpResponse

def home(request):
	return HttpResponse("this is home page")

def Courses(request):
	return HttpResponse("All our courses here")

## We can also add html as well
def cart(request):
	return HttpResponse("<h1>Add your items in cart<h1/>")
Once we are done with the views.py file and have added all the functionalities and different methods, we need to connect it to the urls.py file. We have to define that if a user wants to see the Courses page, the urls.py file should know that the “Courses” method is inside views.py. Another thing to note is that it is not recommended and not good practice to write HTML or CSS inside the view file. We will cover this later in the templates section, so no need to worry for now. I am just showing that it is possible.
To do this, let’s open the urls.py file:
from . import views

urlpatterns = [
	path('admin/', admin.site.urls),
	path('', views.Courses, name='Courses')
]
There are some instructions as comments, so read them, and we already have some imports. Do not remove them, leave them as default. Then we added the above code. Here we are defining that the default page is home, and if a user wants to see the Courses page, the request will go to views.py. Inside views.py, the user will be given access to the Courses() function, which we reference as views.Courses, followed by the name parameter.
Now, let’s try our site:
python3 ../firstProject manage.py runserver
Since we are in a subdirectory inside firstProject, we need to go back to access the manage.py file. We can do this by going back one step using cd .. or by accessing it from the current directory using ../firstProject/manage.py. Then we use the runserver command to run it. Now, let’s check the result.
Default home page will appear.

Cart page

Courses page

HTTP Request Flow in a Django Application
Now, let’s look back at the structure Django is following as discussed above:
- When an end user sends a request, the Django development server receives that request first.
- Django identifies the URL pattern from the request using
urls.pyand determines the corresponding view. - The request is forwarded to the view. The corresponding function is executed, and the required response is sent back to the end user.
Working with Templates and Static Files
Why use templates? It is not recommended to write HTML code inside Python scripts (views.py) because:
- It reduces readability as Python code gets mixed with HTML code.
- There is no separation of roles. A Python developer has to focus on both Python and HTML.
- It does not promote code reusability.
We can overcome these problems by separating HTML code into a separate file. This HTML file is called a template. From the Python file (views.py), we can use these templates as needed. Templates are written once at the project level and can be used across multiple applications. We need to create a directory named templates in the root directory of the project. Inside this directory, we can write our HTML files. For example, here is an index.html file in the templates directory:
firstProject/
├── db.sqlite3
├── firstProject
│   ├── asgi.py
│   ├── __init__.py
│   ├── __pycache__
│   ├── settings.py
│   ├── urls.py
│   ├── views.py
│   └── wsgi.py
├── manage.py
├── static
│   └── style.css
└── templates
    └── index.html
We can write styling or use image files from a directory named static. You need to create this directory just like the templates directory in the project root. Now, let’s first write the HTML code in the index.html file:
<!DOCTYPE html>
<html lang="en" dir="ltr">
<head>
<meta charset="utf-8">
<title>First Template Page</title>
</head>

<body>
<h1>It's working!!</h1>
</body>
</html>
Now we need to link it with the views.py file. First, import render:
from django.shortcuts import render
Then, add the path to the HTML file in the method in views.py:
def home(request):
	return render(request, '/templates/index.html')
You can run and test the program to make sure no errors occur.
For styling, create a style.css file in /firstProject/static/style.css and add your CSS there.
body {
    background-color: blueviolet;
    color: white;
}
h1 {
    text-align: center;
    font-size: larger;
}
Now we have to link this CSS file with the HTML. Add this link inside the <head> section of your HTML:
<link rel="stylesheet" href="style.css">
Here is the updated views.py file with all the changes:
from django.http import HttpResponse
from django.shortcuts import render

def home(request):
	return render(request, '/templates/index.html')

def courses(request):
	return HttpResponse("All our courses are here")

def cart(request):
	return HttpResponse("Add your items in cart")
Now, run the project using:
python3 manage.py runserver
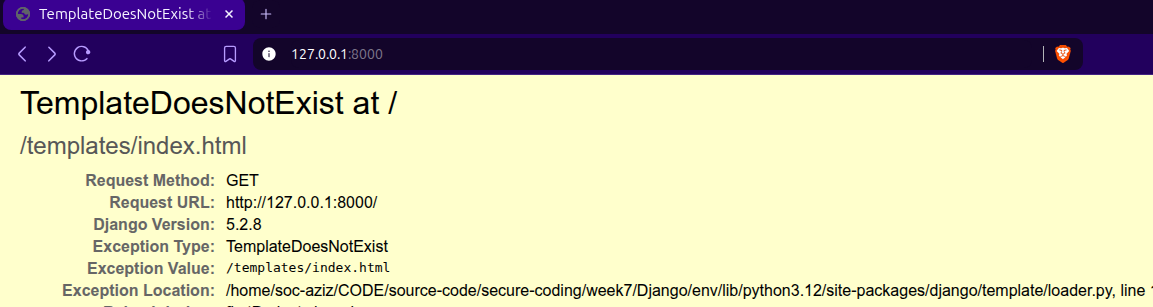 If you get a template-related error, it means Django cannot find the template files. To fix this, you need to update the
 settings.py file.
Open settings.py and look for the TEMPLATES section.
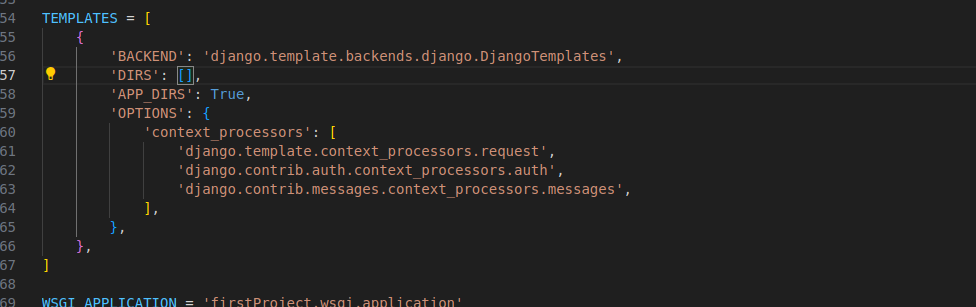 We just need to add one small update to tell Django where to find the template files. In
 settings.py, update
'DIRS': [],
to
'DIRS': ['templates'],
Save the file and run the project again.
It’s working!

It is working, but the CSS is not applied yet. We need to fix this using template injection.
Instead of
<link rel="stylesheet" href="style.css">
use
<link rel="stylesheet" href="{% static 'style.css' %}">
Also, at the top of your HTML file, add:
{% load static %}
Next, we need to add the static path in settings.py. First, make sure to add:
import os
Then, further down in the file, define the static files path.
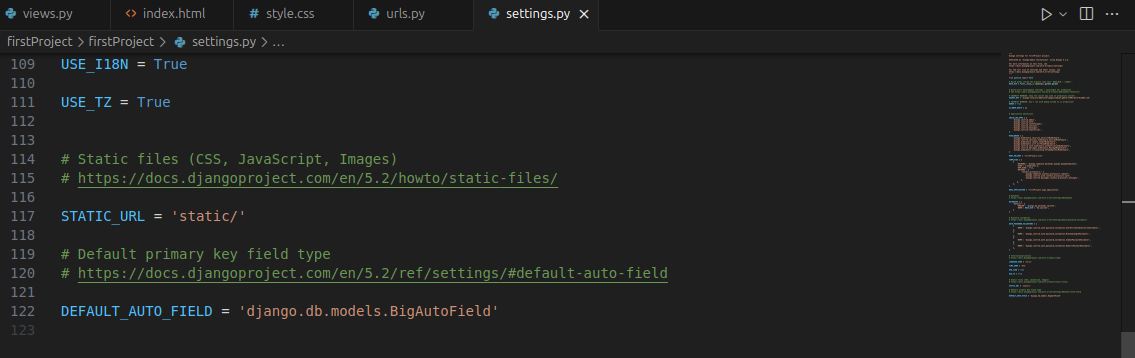
here we have to add STATICFILES_DIRS = [os.path.join(BASE_DIR, 'static')]

Now let’s run it again

Working with Django Apps
Don’t get confused between a project and an app. When we create a project, we give it a project name using: django-admin startproject firstProject . But as the project grows from a simple “Hello World” and becomes more complex, we need to create apps inside the project. An app is not a complete web application by itself. For example, in a bank project, we can have multiple apps like a loan app, registration app, polling app, etc.
To create a Django app (make sure you are inside the project root directory):
python3 manage.py startapp myFirstApp
After running this, you will see more auto-generated files inside the new app folder named myFirstApp.
myFirstApp/
├── admin.py
├── apps.py
├── __init__.py
├── migrations
│   └── __init__.py
├── models.py
├── tests.py
└── views.py
Once we have created the app, the first step is to let the main project know about it. To do this, we need to add the app name in settings.py.
 Simply add the new app name like this:
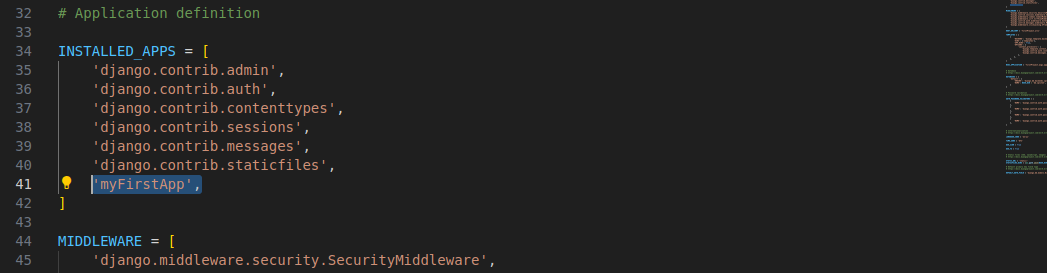
The same code here:
INSTALLED_APPS = [
    'django.contrib.admin',
    'django.contrib.auth',
    'django.contrib.contenttypes',
    'django.contrib.sessions',
    'django.contrib.messages',
    'django.contrib.staticfiles',
    'myFirstApp',                  << Pay attention here
]
Our first app configuration is ready. Now we need to add logic in views.py and create the app HTML, which we will save in: firstProject/myFirstApp/templates/myFirstApp/myFirstApp.html. We create this templates folder and subdirectory for better organization. This way, all templates related to this app are kept in an organized structure. Here is the updated folder structure with these changes:
myFirstApp/
├── admin.py
├── apps.py
├── __init__.py
├── migrations
│   └── __init__.py
├── models.py
├── templates        << Pay attention here
│   └── myFirstApp
│       └── myFirstApp.html
├── tests.py
└── views.py
We can write a simple HTML code for the myFirstApp.html file:
<!DOCTYPE html>
<html lang="en">
<head>
    <meta charset="UTF-8">
    <meta name="viewport" content="width=device-width, initial-scale=1.0">
    <title>My First App In Django</title>
</head>
<body>
    <h1>Testing My First App</h1>
</body>
</html>
Our HTML code is ready, now we need to link this app’s content to the project level. We will work with the urls.py file in firstProject and also create another urls.py file inside the myFirstApp directory. This allows us to link URLs from the project level to the app level. If we don’t do this, and a user visits the URL, Django won’t display the app content because it won’t be aware of it. As we discussed earlier, the request flow from the user to the website will follow this linking. Here is a recap:
 Note that as our project grows, we will need to add more
 urls.py files for new apps, and we will follow the same process for each app. By default, there is no urls.py file in the myFirstApp directory, so we need to create one and add the following code:
from . import views
from django.urls import path, include

urlpatterns = [
	path('', views.myfirstapp, name='My First App'),
]
The code is mostly same as urls.py file in project directory but just some modifications. You can compare. Our app level url file is fine. Now we need to connect this app level urls.py file to the urls.py file in project level.
Open the urls.py file in firstProject directory and add the following lines of code. First, import include like this:
from django.urls import path, include
Then link the two urls.py files like this:
path('myfirstapp/', include('myFirstApp.urls')),
Here is the overall code of project level file urls.py:
from django.contrib import admin
from django.urls import path, include         # << import include

from . import views

urlpatterns = [
	path('admin/', admin.site.urls),
	path('', views.home, name='home'),
    path('courses/', views.courses, name='Courses'),
    path('cart/', views.cart, name='Cart'),
    path('myfirstapp/', include('myFirstApp.urls')),      # << pay attention here
]
Let’s try our project to see if it is working fine. Run it using this command:
python manage.py runserver
Make sure you are in the directory with manage.py. If not, go back to the project root directory and then run the command.
In your browser, go to: http://127.0.0.1:8000/myfirstapp/
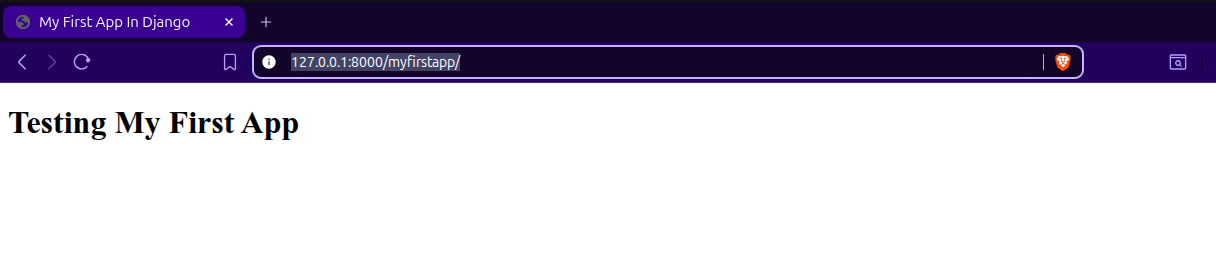 Its’ working fine.
Alright everyone, that’s it for this week. We have covered the basics of Python’s most powerful web application frameworks with hands-on practice. Now we can confidently work with both Django and Flask. As I mentioned before, from next week onwards, we will dive into analyzing the source code of Django-based web apps, and that’s when our real journey into secure coding begins. We will explore secure coding principles, the OWASP Top 10, and learn how to identify and fix insecure code, step by step, with practical examples. If we missed any important topics this week, don’t worry, we will cover them along the way whenever they come up. Also, there is no final project this week to keep things manageable and not make any burden, so we are skipping it. That’s it for now. Stay tuned for next week and get ready to take your coding and security skills to the next level. Good luck!