
Object Oriented Programming (OOP) is one of the most confusing as well as most important topics in programming. The implementation of OOP is not really difficult, but the concepts and design thinking can be confusing. Today, we will cover Python Object Oriented Programming in complete and very detail with practical code examples and analogies as well. We will study topics such as classes, objects, methods, properties, decorators, encapsulation, inheritance, abstraction, and polymorphism. We will learn different methods that make us better programmers. OOP is one of the most important topics in every programming language, not just limited to Python. Whether you are learning Java, C++, or Python, you will have OOP concepts. So, if you learn it once in any language, you can easily shift or study OOP in another language, though syntax and implementation vary noticeably between languages. One thing to remember is that OOP isn’t something you can fully understand just by reading a single blog. This post will be quite long, filled with technical terms, and can get boring if you try to study everything in one hour or even a day. If you’re learning OOP for the first time, take your time and focus on understanding each step and concept. Always search online if you don’t understand what’s happening, why it’s happening, or what would change if you wrote something differently. Do your best to grasp the concepts, and make sure to implement and run each code example yourself for better understanding.
Let’s start
But before diving into Object Oriented Programming practically, let’s first understand what an object and Object Oriented mean.
What is Object? and What is Object Oriented!!
Object (instance): An object, also known as an instance, is a collection of data and associated behaviors. Objects are instances of classes that can be associated with each other. An object is a bundle of related attributes (known as variables) and methods (known as functions). Anything can be an object, such as lists and strings. Think of an object as something that stores data, and we define what data to store. So, knowing what an object is, what does it mean to be Object Oriented? “Oriented” simply means directed toward, so object oriented means functionally directed toward modeling objects. (class?, method?, attributes? what is this?? well no worry we will learn it later).
The central idea here is that everything in Python is an object. The first two core rules of how Python objects work:
- Everything in Python is considered an object.
- Every object is defined by being an instance of at least one class.
There are also some high level concepts related to “Object Oriented” such as Object Oriented Analysis (OOA), Object Oriented Design (OOD), and Object Oriented Programming (OOP). Let’s understand them.
Object Oriented Analysis (OOA) is the process of looking at a problem, system, or task (that somebody wants to turn into an application) and identifying the objects and interactions between those objects. The analysis stage is all about what needs to be done. The output of the analysis stage is a set of requirements. If we were to complete the analysis stage in one step, we would have turned a task, such as “I need a website,” into a set of requirements.
Object Oriented Design (OOD) is the process of converting such requirements into an implementation specification. The designer must name the objects, define the behaviors, and formally specify which objects can activate specific behaviors on other objects. The design stage is all about how things should be done. The output of the design stage is an implementation specification. If we were to complete the design stage in a single step, we would have turned the requirements defined during Object Oriented Analysis into a set of classes and interfaces that could be implemented in ideally any Object Oriented Programming language.
Object Oriented Programming (OOP) is the process of converting this perfectly defined design into a working program that does exactly what the client originally requested.
What is Object Oriented Programming?
Object oriented means directed toward objects. In other words, it means functionally directed toward modeling objects. This is one of the many techniques used for modeling complex systems by describing a collection of interacting objects through their data and behavior. Python, an Object Oriented Programming language (OOP), is a way of programming that focuses on using objects and classes to design and build applications. The major pillars of Object Oriented Programming (OOP) are inheritance, polymorphism, abstraction, and encapsulation (we will learn each of these in detail later).
Why Choose Object Oriented Programming?
Python supports multiple paradigms (procedural, functional, and Object Oriented). OOP offers the following advantages:
- Provides a clear program structure, which makes it easy to map real world problems and their solutions.
- Facilitates easy maintenance and modification of existing code.
- Enhances program modularity because each object exists independently, and new features can be added easily without disturbing the existing ones.
- Presents a good framework for code libraries where supplied components can be easily adapted and modified by the programmer.
- Imparts code reusability.
Procedural and Object Oriented Programming Approach
Before, we were writing procedural programming (POP), where we wrote all the code functions line by line, and everything worked fine. However, the disadvantage here is too much code duplication, the code becomes lengthy, and it is very difficult to modify the code if we want to add new features. Procedural based programming is derived from structured programming, based on the concepts of functions and procedures. Later, we learned to use functions to group code, which reduces redundancy and increases reusability. This is a part of structured programming. However, for even more complex programs, we have a more powerful paradigm, which is Object Oriented Programming (OOP). In real world projects, our main focus is always to make code reusable and reduce redundancy. Objects and classes are just another useful concept in programming, which we will discuss a lot today.
Defining Python Classes and Objects
A class is a blueprint. In a class, we define the properties of something, what it can do and what it should have. Suppose we have many students. We create a blueprint of the student class by defining the students’s properties and methods in a class. Once defined, it is a blueprint for students, but there is no actual student in it yet. A very good example to understand a class is to imagine a classroom of students, let’s name it “MyClass”. Inside the classroom, of course, there will be students. These students are instances (also known as objects) of this class. The students can be one or many, but in class concepts, they are instances of the same class. A class can define a specific set of characteristics that are shared by all objects of that class. A class is a blueprint or template for creating objects. If we want to store objects inside, we must first create a class for them. A simple class can be created like this:
class MyClass:
	pass
The class syntax starts with the class keyword, followed by the name of the class, which can be any name of our choice, and then a colon. The rest of the code is just like writing a function. Following Python rules or style guidelines (PEP 8), the class name should start with a capital letter using CapWords or CamelCase style. The class name must follow standard Python variable naming rules (it must start with a letter or underscore and can only contain letters, underscores, or numbers).
In the above code, we simply use the pass keyword on the second line as a placeholder to indicate that no further action or code is needed for now since we don’t have anything to write yet. The pass statement helps us avoid code errors. Later, we will replace it with more logical code.
To make the blueprint come to life, we need to create objects such as stdA and stdB:
stdA = MyClass()
stdB = MyClass()
Just like we call a function, we also call a class to create its objects. To print any object from the class:
print(stdA)
print(stdB)
Now, to combine the code, it looks like this:
class MyClass:       # class
    pass

stdA = MyClass()     # objects
stdB = MyClass()

print(stdA)
print(stdB)
Run this code and compare the output. You will see that each object is displayed with its memory address, showing that stdA and stdB are two distinct instances of the MyClass class.
 These two objects tell us which class they belong to and what memory address they occupy. Learning memory addresses is not important here. For now, we are just testing that our code works fine.
When an object is created, Python by default initializes it using __init__(), which is called the initializer. The __init__() method sets up or initializes the brand new object with data. It is also called the dunder __init__ method. In Python, if a method starts and ends with double underscores, it is a special function, also known as a dunder method. Why? Well, “dunder” means double underscore, which is why this name is given.
If we don’t write this method during object creation, Python will consider it in the background, but as a good practice, we include it in the code, such as:
class MyClass:
    def __init__():    # <<< init method OR dunder init method
It looks the same as defining a function, but in class concepts, this function is called a method (def anyName()). Once we write a method in a class, the self argument is important to include.
class MyClass:
	def __init__(self):
What is Self?
The difference between methods of classes and functions outside classes is that methods have one required parameter. This parameter is conventionally named self. Following PEP 8 style, we use self, you can technically use another name, but every programmer uses self, so we use it to make our code readable and understandable by others. The self parameter in a method is a reference to the object on which the method is being invoked. The object is an instance of a class, and this is sometimes called the instance variable. We can access attributes and methods of that object via this variable.
Although we always take one parameter, self, we can also pass multiple parameters, such as:
class MyClass:
	def __init__(self, name, marks, address, age):
The name, marks, address, and age are attributes, and this is expressed as `self.property = attrib-name.
class MyClass:
	def __init__(self, name, marks, address, age):
		self.name = name
		self.marks = marks
		self.address = address
		self.age = age
A class contains “data” and “methods.” All these data are called attributes, and methods are known as functions. The difference between classes and objects is that classes describe objects, they are like blueprints for creating objects which we have already discussed before.
__ init__ Initializer
Above, we used the __init__ initializer, but let me explain it more. Most Object Oriented Programming languages have the concept of a constructor, a special method that creates and initializes the object when it is created. Python is a little different. It has both a constructor and an initializer. The constructor method, __new__(), is rarely used unless you’re doing something very advanced. So, we will start our discussion with the much more common initialization method, __init__(). The Python initialization method is the same as any other method, except it has a special name, __init__. The leading and trailing double underscores mean this is a special method that the Python interpreter treats as a special case. This __init__() is called the initializer, but most programmers refer to it as the constructor, which is okay, however, technically, it is the initializer, not the constructor. In Python, __new__() is responsible for creating an instance (the constructor), while __init__() initializes it. Most of the time, we developers only use __init__() for initialization.
Let’s see an example:
class MyClass:
    def __init__(self, name, marks, address, age):
        self.name = name
        self.marks = marks
        self.address = address
        self.age = age
Our code is not complete yet. We have just created a class named MyClass, and inside the class, we have an __init__ method with name, age, address, and marks parameters. The code is still not complete because now we need to create objects and then print the values of these objects. Because for now we have just created a blueprint for object creation. But before writing that code, we first need to understand attributes and methods in more detail.
Attributes and Methods
Any data such as name, marks, address are variables. These are attribute values for the class or attribute values for the method inside the class.
There are two types of attributes:
- Class attributes – common for the class and its objects
- Object attributes / instance attributes. different for each object
Suppose every student has different names and marks, these can be instance attributes. That’s why we use self.name or self.marks, such as:
class MyClass:
    def __init__(self, name, marks):
        self.name = name         # name is an attribute value for the __init__ method
        self.marks = marks       # marks is an attribute value for the __init__ method
But suppose all students are studying in one school. We can use one school name for everyone. If we are writing common values for everyone, we can store them as class attributes.
Let’s understand this with a code example of employees working in the same company, where each employee has different characteristics. Since the company is the same for everyone, we will store the company name as a class attribute and employee specific data in a different method, such as:
class Employee:
    company = "xyz solutions"               # <<< class attribute

    def __init__(self, name, experience):
        self.name = name                    # <<< instance attribute
        self.experience = experience        # <<< instance attribute
Class attributes are defined at the top of the class. Sometimes, some functionality is the same for many objects, so we define it at the class level. Suppose students are studying in one university. Since the university name is the same for all students, we define it at the class level. Each student has different age, address, and degree program, so we define these as instance attributes inside a class method (a function inside a class, known as a method). On the other hand, instance attributes are defined inside a class’s method. Attributes like age, address, and degree require the self prefix.
Let’s see a code example:
class Student:
    university = "Xyz University"

    def __init__(self, name, address):
        self.name = name
        self.address = address
In the above code, we defined class level attributes and method level (instance) attributes. Notice that we used self.property following Python rules. self refers to the current object, and we use the dot (.) to access something inside the method. The name in self.name is called a property. In our case, we are accessing the name and address properties. That’s why you see self.name and self.address (we will discuss properties in more detail later).
So far, in the code examples, we have just defined the object structures. To use these functionalities, we need to create objects and call the class.
Let’s understand this with the help of an example:
#defining object.
student1 = Student()
Think of an object as something that stores data. Here, we define a new object student1 and call the class Student(). Now we know this object is capable of storing data. Inside the parentheses, we can pass arguments. For example, Student(arg1, arg2) corresponds to the two parameters after self in the line:
def __init__(self, name, address):
So in place of arg1 and arg2, we can add:
# Defining object
student1 = Student("Ahmad", "Park City")
Additionally, note that during the calling stage, if we make changes to instance attributes, only that instance is affected. If we make changes to class attributes, all instances are affected.
So far, defining an object is fine. One final step is printing the output. Let’s see it practically:
# Defining object
student1 = Student("Ahmad", "Park City")

# Printing output
print(student1.name)
Here, we are printing just the name of the student.
Now let’s expand the code and add one more parameter, grades. The code looks like this:
class Student:
    university = "Xyz University"

    def __init__(self, name, address, grades):
        self.name = name
        self.address = address
        self.grades = grades

student1 = Student("Ahmad", "Park City", 98)

print(student1.name)
print(student1.address)
print(student1.grades)
Output:

In our class code, we have defined one method, but we can also add multiple methods. To give you another example, let me add a method to get the average marks of a student:
class Student:
    university = "Xyz University"

    def __init__(self, name, address, grades):
        self.name = name
        self.address = address
        self.grades = grades

    def get_avg(self):
	    return sum(self.grades) / len(self.grades)

student1 = Student("Ahmad", "Park City", [98, 95, 33])

print(student1.name)
print(student1.address)
print(student1.get_avg())
print(Student.university)
I have added another method, get_avg(), which simply calculates the average using the formula (sum of all grades divided by the number of subjects). Next, we define the object student1 with values such as name, address, and grades in a list. Lastly, we print the results using the print function. print(student1.name) and print(student1.address). We also printed university name which is defined in class level so we will be using this format: ClassName.attribute. We can also call the get_avg() method and connect it with student1 using the dot (.) operator.
Output:

Parameter Naming in Python
We can use a single parameter in a method, such as self, and we can also pass multiple parameters inside the method. First, let me show you the code above and then explain:
	def __init__(self, name, address, grades):
	    self.name = name
	    self.address = address
	    self.grades = grades
In self.name = name, the name in self.name is called a property of self. We are creating a new property inside self and naming it name. This is then set equal to the name parameter passed to the method. So our object now has a property called name.
Pillars of OOP
Whether you are learning OOP in Java, C++, or Python, these four topics are considered as pillars of OOP and understanding these are very important: Abstraction, Encapsulation, Inheritance and Polymorphism.
- Inheritance: When one class (child class or derived class) derives the properties and methods of another class (parent class or base class).
- Abstraction: Hiding the implementation details of a class and only showing the essential features to the user. Abstraction is the process of encapsulating information with separate public and private interfaces. The private interfaces are subject to information hiding. We hide unnecessary features and code inside the class, while outside the class, we just call the class functions without the user knowing what is happening internally.
- Encapsulation: Wrapping data and methods into a single unit (object). The way we structure a class and its objects is called encapsulation. Think of it like a capsule containing data and methods inside.
- Polymorphism: Poly means many, and morphism means shapes. Polymorphism simply means using the same method name but with different behavior depending on the object.
Let’s understand each of these in detail.
I. Inheritance
The simplest way to understand inheritance is that it decreases code duplication and increases code reusability. But how does it work? Imagine you have multiple classes, and several of these classes contain the same methods. Is repeating the same code in each class a good approach? No! Python inheritance teaches us that instead of writing the same methods or attributes repeatedly in each class, we can inherit them from another class. This way, we write the code once and reuse it in multiple classes. That’s called inheritance. Inheritance allows a class to inherit attributes and methods from another class.
Types of Inheritance
- Single Inheritance
- Multilevel Inheritance
- Multiple Inheritance
- Hierarchical Inheritance
- Hybrid Inheritance
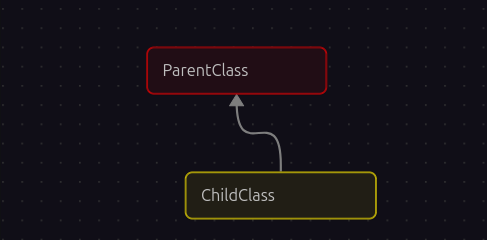
1. Single inheritance:
In single inheritance, only a single child class inherits from a single parent class.
Now let’s understand this more. There is a concept of parent and child classes. Suppose we want to create two classes: one for Employee and one for Manager. The Employee class has properties and methods such as name and emp_id. The child class, Manager, also needs name and emp_id. Employee is the parent class, and Manager is the subclass or child class. So Instead of writing name and emp_id again in the Manager class, we can inherit them from the parent class to avoid code duplication. We can define some methods inside the parent class Employee, and the child class Manager can inherit these properties.
“Inheritance allows a new class (the child class or subclass) to inherit all the attributes and methods of an existing class (the parent class or superclass).”
Let’s understand this practically:
# Parent Class
class Employee:
    def __init__(self, name, emp_id):
        self.name = name
        self.emp_id = emp_id

    def show_details(self):
        print(f"Employee: {self.name} (ID: {self.emp_id})")

    def work(self):
        print(f"{self.name} is doing some work.")
The parent class Employee contains methods such as the dunder __init__() method with two parameters: name and emp_id. The next method is show_details(), followed by the work() method. (Please don’t be confuse with the f-strings. We have already studied this in previous posts.) So far, this code is simple and works as expected, which we have already seen before. Now, let’s add another class, Manager:
# Child Class
class Manager(Employee):

    def __init__(self, name, emp_id):
Now, in this portion of the code, there are some changes. In Python inheritance, whenever we want to inherit attributes from an existing class, such as the Employee class, the child class, like Manager, must specify that it inherits from the parent class. We do this by writing like this: class ChildClass(ParentClass) in our case class Manager(Employee) .
Here, the new thing is the parentheses containing the parent class name. This tells Python that the child class can use or inherit any attributes or methods from the parent class. That is the syntax.
The next line is the Python dunder __init__ method along with parameters: def __init__(self, name, emp_id):
To inherit attributes or methods from the parent class into the child class, we can use the super() function.
# Child Class
class Manager(Employee):

    def __init__(self, name, emp_id):
        super().__init__(name, emp_id)

    def manage_team(self):
        print(f"{self.name} Manager is managing the IT team.")
super() is used to call a method from the parent class. Here, super() refers to the parent class Employee, and the dot (.__init__(name, emp_id)) is used to access the parent class’s __init__ method. We will discuss the super() function and method overriding in more detail later. For now, just understand that super() in a child class is used to call methods from its parent class.
Now it’s time to call the objects:
emp = Employee("Ali", "T342")
emp.show_details()
emp.work()

mngr = Manager("Mr. Ahmad", "L380")
mngr.manage_team()
mngr.work()
In the Manager class, we didn’t define method work() but in defining objects stage we can use it in Manager class. Its like this method is defined in Manager class as well but in reality no… we inherited them from the parent class. Now we can easily use them. However, if we didn’t inherit, we would have to define them in the subclass; otherwise, it would cause an error. That’s the beauty of Inheritance.
Output:

Method Overriding and super() Function
Inheritance is great for adding new behavior to existing classes, but what about changing behavior? Our Employee class allows only a name and an employee ID. This may be sufficient, but what if we want to add a department for our Manager? We can do this by setting a department attribute on the Manager after it is constructed. However, if we want to make this third variable available during initialization, we have to override the __init__() method. Overriding means altering or replacing a method of the superclass with a new method (with the same name) in the subclass. No special syntax is needed to do this. The subclass’s newly created method is automatically called instead of the superclass’s method, as shown in the following code:
class Manager(Employee):

    def __init__(self, name, emp_id, department):
        self.name = name
        self.emp_id = emp_id
        self.department = department
Any method can be overridden, not just __init__(). However, this example has some problems. The Employee and Manager classes have duplicate code to set up the name and emp_id properties. This can make code maintenance complicated, as we would need to update the code in multiple places. Additionally, if we add a feature to the Employee class, we would like it to also be part of the Manager class.
What we really need is a way to execute the original __init__() method of the Employee class from inside our new class. This is exactly what the super() function does. It returns an object as if it were an instance of the parent class, allowing us to call the parent’s method directly. The super() function, is used in a child class to call methods from its parent class.
Why do we need the super() function? We need a way to execute the original __init__() method of the Employee class from inside our new class (Manager). The Manager class inherits from the parent Employee class. Let’s focus on a code example to understand this:
# Child Class
class Manager(Employee):

    def __init__(self, name, emp_id, department):
        super().__init__(name, emp_id)
        self.department = department
In this example, super() first binds the instance to the parent class and calls the parent __init__() method, passing the expected parameters. It then performs its own initialization, namely setting the department attribute, which is unique to the Manager class. This does not affect the super() function. The department is only for the Manager class.
A super() call can be made inside any method, so all methods can be modified via overriding and calls to super(). The call to super() does not have to be the first line of the method. for example, we might need to manipulate or validate incoming parameters before forwarding them to the superclass.
Overall, the purpose of the super() function is to avoid code duplication, inherit methods and attributes from another class, and make future modifications easier. With inheritance and super(), we can write code once, use it anywhere, and modify it once to have it work everywhere.
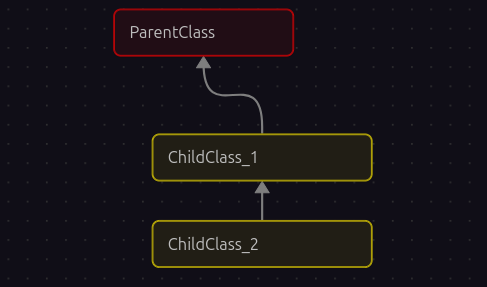
2. Multi level Inheritance
In multi level inheritance, Child_1 inherits from the Parent class (also known as Base), and Child_2 inherits from Child_1. Here, Child_1 acts as both a child of Parent and a parent for Child_2.
Below is the format for defining multi level inheritance classes:
class Parent:
    pass

class Child_1(Parent):
    pass

class Child_2(Child_1):
    pass
Now let’s understand this with a real world example. Suppose we have three classes: Employee, Manager, and SeniorManager:
# Parent Class
class Employee:
    def __init__(self, name, emp_id):
        self.name = name
        self.emp_id = emp_id

    def show_details(self):
        print(f"Employee: {self.name} and employee ID: {self.emp_id}")

    def work(self):
        print(f"{self.name} is doing some work.")

# Child_1 Class
class Manager(Employee):
    def __init__(self, name, emp_id, department):
        super().__init__(name, emp_id)
        self.department = department

    def manage_team(self):
        print(f"{self.name} is managing the {self.department} department.")

# Child_2 Class
class SeniorManager(Manager):
    def __init__(self, name, emp_id, department, level):
        super().__init__(name, emp_id, department)
        self.level = level

    def make_some_decision(self):
        print(f"{self.name} (Level: {self.level}) is making some decision for {self.department} Department.")


# Object Creation
sm = SeniorManager("Javed", "S400", "IT", "Senior")
sm.show_details()
sm.manage_team()
sm.make_some_decision()
To explain the above code simply, we have three main classes, and each class contains methods. First, the parent class Employee contains multiple methods and attributes. Next, the Manager class inherits properties and methods from its parent class, which is why the Employee class name is mentioned in parentheses. Lastly, the third class, SeniorManager, inherits properties and methods from its parent class, Manager, which is why Manager is mentioned in parentheses. and the best part is that from last class which is SeniorManager do auto inherit methods from Employee class. If you look at the end sm.show_details(). show_details()is the method inside Employee class but we can use in SeniorManager. Inheritance is not directly applied but as Child_1 inherit from his parent the same Child_2 inherit from from his parent Child_1 so the inheritance is indirectly applied here. At the end, we create objects and print the result. that’s it. It may look complex, but in reality, it is very easy to understand. Please run the code and try to write on your own and follow each step to see how it works.
Output:

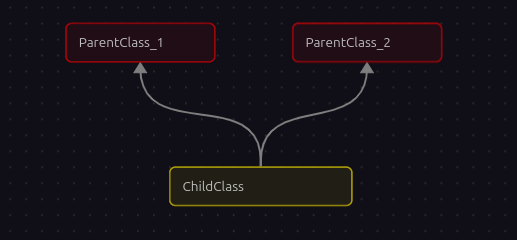
3. Multiple Inheritance
A subclass that inherits from more than one parent class can access functionality from all of them.
Here is a sample class syntax showing how to define it:
class Child(Parent_1, Parent_2):
pass
Or, to make it more understandable:
class Parent_1:
	pass

class Parent_2:
	pass

class Child(Parent_1, Parent_2):
	pass
The syntax for multiple inheritance looks like a parameter list in the class definition Child(Parent_1, Parent_2). Instead of including only one base class inside the parentheses, we include two (or more) classes, separated by a comma. This allows the Child class to use the methods and attributes of both Parent_1 and Parent_2.
Now let’s understand this with a more real world code example using Employee, Manager, and Department classes:
# Parent_1 Class
class Employee:
    def __init__(self, name, emp_id):
        self.name = name
        self.emp_id = emp_id

    def show_details(self):
        print(f"Employee: {self.name}, (ID: {self.emp_id})")

    def work(self):
        print(f"{self.name} is doing some work.")


# Parent_2 Class
class Department:
    def __init__(self, department_name):
        self.department_name = department_name

    def show_department(self):
        print(f"Department: {self.department_name}")


# Child Class (inherits from both Employee and Department)

class Manager(Employee, Department):
    def __init__(self, name, emp_id, department_name):
        Employee.__init__(self, name, emp_id)        # << inherit from Employee class
        Department.__init__(self, department_name)   # << inherit from Department class

    def manage_team(self):
        print(f"{self.name} (ID: {self.emp_id}) is managing the {self.department_name} team.")


# Object Creation
mngr = Manager("Mr. Ahmad", "S400", "IT")
mngr.show_details()
mngr.show_department()
mngr.manage_team()
As you can see the Child Class Manager inherits from both Employee and Department using this format: class Manager(Employee, Department) . Mentioning the classes is must to pass inside the parenthesis. Next we have used the Employee.__init__(self, name, emp_id) and Department.__init__(self, department_name). So we are avoiding code duplication. We can also use super()function and as well as ClassName.__ init…. Now I hope you got the concept.
Output:

Access Modifiers
In Python, access modifiers are used to control the accessibility of data, ensuring the security of data from unauthorized access and exploitation. We have three types of access modifiers: Public, Protected, and Private.
class Secrets:
    def __init__(self, name, ssn, bank):
        self.public = name
        self._protected = ssn
        self.__private = bank
In the above code, we have a class named Secrets with a dunder __init__ method and parameters self, name, ssn, bank. The important part to note that self.public = name has no underscore, so this attribute is public and can be accessed from anywhere. next in self._protected = ssn it contain single underscore, so it is protected. Technically, it should not be accessed directly outside the class or its subclasses, though Python does not strictly enforce this so it is accessible we will try this. And the last one self.__private = bank it comes with double underscore so it is private and cannot be accessed directly from outside the class. Note here is that the naming ‘private’, _ protected, __ private is not important to use. You can name it anything. the only thing matter are the simple name, single underscore and double underscore.
Let’s see this in practice:
class Secrets:
    def __init__(self, name, ssn, bank):
        self.public = name
        self._protected = ssn
        self.__private = bank

data = Secrets("Aladin", "11223344", "2233904492829")
print(data.public)
print(data._protected)
print(data.__private)
Output:
 Now, if you look at the output, we can access the
 name attribute, which makes sense because it is a public attribute, and public attributes have no underscore. Next, you can see that we can access the social security number (SSN), which starts with a single underscore. In Python, this is considered protected, but it is still accessible. Lastly you can see the error in the output screenshot. This will raise an AttributeError for data.__private because private attributes cannot be accessed directly outside the class. The public and _protected attributes will print their values. It is because the private attribute start with double underscore so it is not possible to access it outside the class that’s why it gives us error. But what if we want to access it outside the class? Well python performs name mangling on private attributes, allowing limited access outside the class. This technique uses the format: _ClassName__attribute.
Now, let’s modify the code again, and I want you to pay attention to the private attribute. Run it:
data = Secrets("Ali", "43434224", "2233904492829")
print(data.public)
print(data._protected)
print(data._Secrets__private) # << pay attention here
We used this format (known as name mangling): ‘variable._ ClassName__attribute’. In our case ‘data._ Secrets__private’
Output:
 Now, it is accessible using the name mangling technique for private attributes.
II. Encapsulation
Encapsulation is the process of wrapping data and objects into a single unit (Object). The way we write classes and objects is an example of encapsulation. Encapsulation is essentially writing code in units, such as methods and attributes inside a class. We discussed this earlier in the “Access Modifiers” topic. The process of hiding the implementation details of an object is often called information hiding. It is also related to encapsulation, although encapsulation is a slightly broader concept. Encapsulated data is not necessarily hidden. Encapsulation is like creating a capsule (or wrapper) around the attributes. It means grouping data and behaviors, such as attributes and methods, into a single unit. For example, a TV’s external case encapsulates the state and behavior of the television. We have access to the external screen, the speakers, and the remote, but we don’t have direct access to the wiring of the amplifiers or receivers inside the TV’s case.
We have already seen a practical implementation of encapsulation. The way we wrote code before, grouping methods and attributes in classes, is all an example of encapsulation.
III. Abstraction
Abstraction means hiding complexity and providing a simple interface. We need to define what something does, but not how it does it. An “abstract class” is a class that is not meant to be instantiated. It defines a set of methods that all child classes must implement. No worry, we will understand it with the help of a code example. For this code example, we will use an external module provided by Python named abc (Abstract Base Class) module.
Let’s understand it first with a simple blueprint, then we will apply it in some program that makes sense:
from abc import ABC, abstractmethod

class Employee(ABC):
    pass

class Developer(Employee):
    pass

class Manager(Employee):
    pass
This is a very simple blueprint of three classes and it contains code, or in our case, uses the pass keyword. So imagine it contains code, right. Now you can consider the Employee class as the Base class (Parent) because the other classes inherit from it.
Now if we want to enforce any method on child classes, they must create this method. Otherwise, the program will give an error. Here, @abstractmethod helps us. We have to define the abstract method in the Base Class, which is Employee. Now look at the updated blueprint again:
from abc import ABC, abstractmethod

class Employee(ABC)
	def __init__(self):
		pass

	@abstractmethod
	def must(self):
		pass
Now I have added two methods in the Employee class but one of the method is abstract method which is defined as @abstractmethod decorator (decorator - start from @). So now this method name as must() must be created in child classes. You can give any name to the method but here I am writing the method name as must() for better understanding but not important to stick to this. Now look again below at the blueprint again with more updates:
from abc import ABC, abstractmethod

class Employee(ABC)
	def __init__(self):
		pass

	@abstractmethod
	def must(self):
		pass

class Developer(Employee):
	def other_method(self):
		pass

	def must(self):
		pass

class Manager(Employee):
	def must(self):
		pass

	def any_other_method(self):
		pass
now as you can see the child classes adapting the must() method which is the implementation of abstract method. No matter the child class can create any other methods as many as needed but the one abstract method is necessary to create in each sub class. Additionally you can pass any kind of data inside that method. Only creating the method is a must in abstract rules.
Now let’s understand it more with some real world Employee, Developer, and Managerscenario based code example:
from abc import ABC, abstractmethod

# Abstract Base Class
class Employee(ABC):
    def __init__(self, name, emp_id):
        self.name = name
        self.emp_id = emp_id

    def show_details(self):
        print(f"Employee: {self.name}, (ID: {self.emp_id})")

    # Abstract method
    @abstractmethod
    def work(self):        # << Pay attention here
        pass

# Child Class Developer implementing abstract method
class Developer(Employee):

    def work(self):        # << Pay attention here
        print(f"{self.name} is writing code and fixing bugs.")

# Child Class Manager implementing abstract method
class Manager(Employee):

    def work(self):        # << Pay attention here
        print(f"{self.name} is managing team meetings and project schedules.")
Creating objects and calling methods:
# Creating objects
dev = Developer("Aziz", "D101")
mngr = Manager("Mr. Ahmad", "M202")

dev.show_details()
dev.work()

mngr.show_details()
mngr.work()
Now we have an abstract class Employee with a regular method show_details() and an abstract method work() defined using @abstractmethod decorator. Each child class (Developer and Manager) must implement the work() method. They can also have other methods if needed, but the abstract method is mandatory.
Output:
 If you run this code, it will work fine and print the details and actions of both employees. If you comment out the
 work() method in any child class and run the program again, Python will raise a TypeError because you cannot instantiate a subclass that hasn’t implemented all abstract methods.
IV. Polymorphism
Polymorphism is one of the four pillars of OOP in Python. Polymorphism means many forms or many shapes. Smply means the same method name can have different behavior depending on the object.
Imagine you have a method called connect in a base class:
class Database:
	def connect(self):
		raise NotImplementedError()
You can have another connect method in a subclass:
class MySQLDatabase(Database):
	def connect(self):
		print("Connecting to mySQL Database..")
Similarly, another class can implement connect differently:
class PostgresDB(Database):
	def connect(self):
		print("Connecting to PostgreSQL Database..")
And another class for MongoDB:
class MongoDB(Database):
	def connect(self):
		print("Connecting to MongoDB Database..")
During inheritance, the child class inherits properties from the parent class. But this does not mean the method must behave the same. Each child class is free to modify it. You don’t need separate methods like connect_mongodb() or connect_mysql() for each class. One connect() method can handle all, and that is the power of polymorphism. The same method name works differently depending on the object.
Duck Typing…
There is also another concept called duck typing: “If it walks like a duck and it quacks like a duck, then it must be a duck”. This is Python’s core philosophy for polymorphism. Python doesn’t care what class an object belongs to. It only cares if the object has the method you are trying to call. Let’s understand it with a code example:
class VideoPlayer:
    def play(self):
        print("Playing video...")

class AudioPlayer:
    def play(self):
        print("Playing audio...")

class DocumentViewer:
    def view(self):
        print("Viewing document...")
Suppose we have different classes such as VideoPlayer, AudioPlayer, and DocumentViewer. Some of the classes contain the same method, such as play() inside VideoPlayer and AudioPlayer. Duck typing combined with polymorphism teaches us that no matter which class an object belongs to, if the object has the valid method, we can call it without any issue.
Creating objects:
video = VideoPlayer()
audio = AudioPlayer()
doc = DocumentViewer()
We can call the play() method no matter which class contains it. Each class can have the same method but with different behavior.
start_media(video) # This Works
start_media(audio) # This Works
start_media(doc)   # This would FAIL, because 'doc' does not have a .play(). It contain 'View'
Overall, polymorphism means the same method can have different behavior depending on the object. Python supports it through both inheritance and duck typing. Polymorphism makes your code modular, scalable, and readable.
Static Methods, Class methods, Decorators
Static Methods
Static methods, marked with the @staticmethod decorator. They don’t receive self or cls parameters and can’t modify object specific or class specific data directly. Static methods are used for utility functions that logically belong to the class but don’t need access to the class or instance itself. For example, you might have a method to validate an email format, that is related to your class but doesn’t depend on any particular object. Static methods keep your code organized by grouping related functionality in the class without requiring an object to call it.
Here is a simple example:
class Student:
    def __init__(self, name, marks):
        self.name = name
        self.marks = marks

    @staticmethod
    def greet():
        print("Hello Learner!")

# Object creation
student1 = Student("Javed", [99, 33, 22])

# Calling static method
student1.greet()
Student.greet()  # We can also call it directly using class name
In this example, greet() doesn’t use self because it doesn’t need any information from the object. It just prints a message If a method doesn’t include self or cls but is called via an instance, Python automatically passes the instance as the first argument, then you will get a TypeError: TypeError: Student.greet() takes 0 positional arguments but 1 was given , unless the method is declared as a static method. We can call it using the object like student1.greet() or directly from the class like Student.greet(). This is the simplest way to understand static methods.
Output:

Class method
On the other hand, class methods are tied to the class itself rather than any individual object. We use the @classmethod decorator to create them, and they receive cls as their first parameter, which points to the class. Class methods are helpful when we want to maintain or update information that is common to all objects, like a school name for all students, a company name for all employees, or tracking the total number of objects created from a class. In real world Python programs, class methods are often used for factory methods that create objects in a specific way or for any functionality that affects the class as a whole, instead of individual objects.
a simple example:
class Student:
    school_name = "Xyz School"

    def __init__(self, name):
        self.name = name

    @classmethod
    def change_school(cls, new_name):
        cls.school_name = new_name

student1 = Student("Javed")
student2 = Student("Ahmad")

print(student1.school_name)  # Xyz School
print(student2.school_name)  # Xyz School

Student.change_school("Chambell Security")

print(student1.school_name)  # Chambell Security
print(student2.school_name)  # Chambell Security
In this example, change_school() is a class method. It takes cls as its first argument, which represents the class itself. When we call it using Student.change_school(Chambell Security), it changes the school_name for all objects. That’s the main difference from instance methods, which only affect the specific object.
Instance Method
In Python, methods and decorators play a huge role in how we structure our classes and manage data. We already learned about methods, such as class methods, and static methods, but it’s important to understand why each of these exists and how they are used in real world programming. An instance method is the most common type of method. It works with the self parameter and allows you to access and modify the data stored in an individual object. When you create multiple objects from the same class, each object has its own set of instance attributes, and instance methods let you operate on those specific values. For example, we have used many times above the example of student in student management system, each student object can have different marks or names, and instance methods allow us to calculate grades or display personal details for each student individually.
For example:
class Student:
    def __init__(self, name, marks):
        self.name = name
        self.marks = marks

    def show_info(self):
        print(f"Student: {self.name}, Marks: {self.marks}")

student1 = Student("Aladin", 90)
student2 = Student("Zafar", 85)

student1.show_info()  # Student: Aladin, Marks: 90
student2.show_info()  # Student: Zafar, Marks: 85
In this example, show_info() is an instance method. Each object (student1 and student2) has its own name and marks, and the method prints the data specific to that object. If we change marks for student1, it will not affect student2. Instance methods are the most common type of methods because they work with the individual object’s data.
Property Decorator with Getter, and Setter in Python
We have the @property decorator, which is another way to manage attributes. In real world based python projects, we often need to control access to data, maybe because it must meet certain criteria or because we want to hide the internal implementation. The @property decorator allows us to create getter methods that can be accessed like normal attributes. This means we can run code whenever an attribute is accessed without changing how we write code outside the class. It makes the code cleaner and easier to read. For example, we could calculate the average marks of a student every time it is accessed, without storing it in a separate variable.
1. Getter with @property
The getter works hand in hand with the setter, created using the @property.setter decorator. Setters allow us to define rules for modifying attributes. We can check if a value is valid before assigning it, log changes, or trigger some other action whenever an attribute changes. Setters are essential for maintaining data integrity. Imagine a banking application where you need to ensure an account balance never goes below zero, or a student management system where marks cannot be negative or exceed a certain limit. By using getters and setters, we as a developers can provide a clean interface to their class while keeping the underlying data in a control way.
Example:
class Student:
    def __init__(self, name, marks):
        self.name = name
        self._marks = marks  # Using underscore to indicate "protected"

    # Getter
    @property        # << pay attention here
    def marks(self):
        print("Getting marks...")
        return self._marks
The _marks is the actual attribute storing the marks. marks() is a method that returns the value of _marks. The @property decorator allows us to call it like an attribute, not a method.
student1 = Student("Ali", [90, 80, 70])
print(student1.marks)
If you notice here no parentheses added, because it acts like attribute.
Output:

2. Setter with @methodName.setter
Sometimes we want to update an attribute, but we want to control or validate the new value. For example, marks should only be numbers between 0 and 100. A setter helps with this.
class Student:
    def __init__(self, name, marks):
        self.name = name
        self._marks = marks

    # Getter
    @property
    def marks(self):
        return self._marks

    # Setter
    @marks.setter        # << pay attention here
    def marks(self, new_marks):
        if not all(0 <= mark <= 100 for mark in new_marks):
            print("Error: Marks must be between 0 - 100")
        else:
            self._marks = new_marks
            print("Marks updated successfully")
The @marks.setter links this method to the marks property. The setter receives the value you assign to marks (like student1.marks = [95, 80, 75]). Inside the setter, you can validate, manipulate, or log the value before saving it. Code Example:
student1 = Student("Ali", [90, 80, 70])
student1.marks = [95, 85, 75]  # Valid
print(student1.marks)

student1.marks = [110, 90, 80]  # Invalid
Output:

Contact Manager - Our Mini Project
Its time for a mini project where we will cover all the OOP learning in once. As we do a mini project every week. Same for this week I have planned a mini project where we will see these OOP topics implementation in real world projects. So I have planned a small project which will be a Contact Manager where user can add, view, save and exit the program with proper error handling. If a user want to save a contact then just user name in a string and phone number with integer value should be saved otherwise it will raise error. Next once user enter a name and phone number then their should be a prompt to not to forget to save the contact now by entering command ‘save’. We will want to save contacts in a .csv file. Please note that if we are working with csv file then we need to import a module ‘csv’ and also as we know working with files and saving it so it must need a path so that’s why we will also need to import a module ‘os’ as well.
import csv
import os
We will also need some classes to work with such as ‘Contact’ and ‘ContactManager’ and this classes will contain multiple methods which i don’t know for now but we will add methods as when we have the requirements.
class Contact:
	pass

class ContactManager:
	pass
We can also make the project in multiple modules that then we inherit from one class to another but for now I want to make it simple in a single file so that you understand it easily.
Now let’s begin with the implementation part. First we will define our class ‘Contact’ which will store individual contact details such as name and phone number. Inside this class we will define our constructor method ‘init’ and will make both name and phone protected by using underscore before the variable name.
class Contact:
	def __init__(self, name, phone):
        self._name = name
        self._phone = phone

    @property
    def name(self):
        pass

    @property
    def phone(self):
        pass

    def to_list(self):
        pass
Then we will also define property methods so that we can easily access the name and phone outside the class in a safe way. After that we will define another class called ‘ContactManager’ that will handle adding, saving and viewing all the contacts.
class ContactManager:
    pass

    def __init__(self):
		pass

    def add_contact(self, name, phone):
        pass

    def save_contacts(self):
	    pass
In this class we will first check if our csv file exists or not, if not then it will automatically create one and also write the header row to it. The class will also contain methods like add_contact, save_contacts and view_contacts where each method will perform its own functionality such as adding new contact in a list, saving all unsaved contacts to the csv file and viewing already saved contacts from the file.
Once we are done with defining our classes then we will create an object of ContactManager class in the main section of our code and will provide some commands to the user such as add, view, save and exit. The program will keep running until the user enter exit command. When user enters add command, it will ask for name and phone and will check for validation as well like name should only contain alphabets and phone number should only contain digits and we can do this with .strip(), .isalpha(), .isdigit(). If any invalid input is given then it will show proper error message and ask for correct input again. When all inputs are valid then it will add the contact successfully and show a message to remind user to save the contact. Once user enters save command it will save all unsaved contacts in the csv file and show the confirmation message. If user enters view command then it will read all saved contacts from csv file and display them on screen.
In the end if user wants to exit, just type exit and the program will end safely. In this way we are implementing our OOP concepts such as encapsulation, classes, methods, and file handling in a simple and practical project which is easy to understand and useful as well.
here is our complete code Contact_manager.py
import csv
import os

class Contact:
    """Represents a single contact.
    def __init__(self, name, phone):
        self._name = name
        self._phone = phone

    @property
    def name(self):
        return self._name

    @property
    def phone(self):
        return self._phone

    def to_list(self):
        """Return contact details as a list."""
        return [self._name, self._phone]


class ContactManager:
    """Handles adding, saving, and viewing contacts."""
    FILE_NAME = "contacts.csv"

    def __init__(self):
        self.contacts = []
        if not os.path.exists(self.FILE_NAME):
            with open(self.FILE_NAME, "w", newline='') as file:
                writer = csv.writer(file)
                writer.writerow(["Name", "Phone"])

    def add_contact(self, name, phone):
        contact = Contact(name, phone)
        self.contacts.append(contact)
        print(f"Contact '{name}' added successfully! Please don't forget to save the contact by entering command: 'save' ")

    def save_contacts(self):
        """Saves all contacts to CSV file."""
        if not self.contacts:
            print("No new contacts to save.")
            return
        try:
            with open(self.FILE_NAME, "a", newline='') as file:
                writer = csv.writer(file)
                for contact in self.contacts:
                    writer.writerow(contact.to_list())
            print(f"{len(self.contacts)} contact(s) saved to '{self.FILE_NAME}'.")
            self.contacts.clear()
        except Exception as e:
            print(f"Error while saving contacts: {e}")

    def view_contacts(self):
        """Reads and displays contacts from the CSV file."""
        if not os.path.exists(self.FILE_NAME):
            print("No contacts found.")
            return

        try:
            with open(self.FILE_NAME, "r") as file:
                reader = csv.reader(file)
                next(reader)
                data_found = False
                print("\nSaved Contacts:")
                for row in reader:
                    if row:
                        data_found = True
                        print(f"Name: {row[0]}, Phone: {row[1]}")
                if not data_found:
                    print("No saved contacts yet.")
                print()
        except Exception as e:
            print(f"Error while reading contacts: {e}")


# <<< Main >>>
if __name__ == "__main__":
    manager = ContactManager()

    print("\nWelcome to Our Perfect Contact Manager :)")
    print(f"*"*40)
    print("Commands: add | view | save | exit")
    print(f"*"*40)

    while True:
        try:
            cmd = input("Enter command: ").strip().lower()

            if not cmd:
                print("Empty input is not allowed.")
                continue

            if cmd == "add":
                while True:
                    name = input("Enter name: ").strip()
                    if not name:
                        print("Name cannot be empty.")
                        continue
                    if not name.replace(" ", "").isalpha():
                        print("Name should only contain letters.")
                        continue
                    break

                while True:
                    phone = input("Enter phone: ").strip()
                    if not phone:
                        print("Phone cannot be empty.")
                        continue
                    if not phone.isdigit():
                        print("Phone number must contain only digits.")
                        continue
                    break

                manager.add_contact(name, phone)

            elif cmd == "view":
                manager.view_contacts()

            elif cmd == "save":
                manager.save_contacts()

            elif cmd == "exit":
                print("Exiting program!")
                break

            else:
                print("Invalid Command! Please Try: add | view | save | exit\n")

        except KeyboardInterrupt:
            print("\nProgram interrupted.")
            break
        except Exception as e:
            print(f"Unexpected error: {e}")
here is the output of the commands I tried to test the program:

:)
Alright everyone, that’s it for Object Oriented Programming in Python. I know the blog shouldn’t be this long, I didn’t expect that I would go this deep and make it so long and maybe boring. But trust me, covering OOP in one single post is not possible, even OOP needs a complete book to cover everything. Still, I haven’t covered all the topics, there is so much more to learn in Object Oriented Programming such as Exception Handling, File Handling, Data Structures, and Design Patterns. There are so many things you can go deep into if you want to master it. But here, I have tried my best to cover all the essential things with deep explanations and practical implementations along with code examples. So if you have followed me till now and have covered these topics that we studied in this post, then you are good enough, and your knowledge is enough for the purpose of this course which is studying secure coding in Python. Again, congratulations if you are here, and next week we will move to our next topic where we will study Python frameworks such as Flask, Django, and FastAPI. Of course, these are also big topics, and we can’t cover everything, but the important concepts that are must to understand, like how to create Flask apps, Django-based projects, etc. before moving toward learning how to secure these apps. Trust me, from now on you will feel more motivated by working with more realistic things. Till now, we were studying Python but it didn’t make much sense because there was no real world implementation. So stay tuned till next week. If you have any questions, recommendations, or if you find any misinformation in the blog and want to report it to me, please feel free to reach out to me on LinkedIn: https://www.linkedin.com/in/aziz-u000/