
Broken Authentication
Broken authentication is a critical security vulnerability where flaws in the authentication process allow attackers to gain unauthorized access to user accounts or systems by exploiting weak login mechanisms, stolen credentials, or compromised session tokens. It remains a top threat, having been ranked #2 on the OWASP Top 10 list in 2017 and later reclassified as “Identification and Authentication Failures” in the 2021 (OWASP A07:2021) and “Authentication Failures” in the 2025 (OWASP A07:2025) update, reflecting its ongoing significance in web application security. Common causes include the use of weak or default passwords, lack of multi-factor authentication (MFA), poor session management such as exposing session IDs in URLs or failing to invalidate them after logout, and inadequate protection against automated attacks like credential stuffing and brute force. These weaknesses can lead to severe consequences, including data breaches, identity theft, financial fraud, and full system compromise, particularly if an attacker gains access to privileged accounts. To mitigate these risks, organizations should implement strong password policies, enforce MFA, use secure session management practices such as server-side session storage with high-entropy tokens, and ensure proper token expiration and revocation. We will study some of the methods, mitigation practices, code review and making the code secure later with detail explanations and with practical implementations in this blog.
So let’s delve in…
Make sure to clone week 10 directory:
git clone https://github.com/0xorone/week10.git
Before running the application make sure to setup virtual environment and install the requirement modules and libraries.
Authentication Components
Today we will be looking at some of the many ways that authentication can be broken and vulnerable in the website. There is a lot that can go wrong. We are going to start by looking at authentication so that we can see all of the moving parts involved. That should give us an idea of the reason authentication can be such a big problem. We are then going to look at some of the most common attacks you are likely to face when it comes to authentication. This will center around attacks such as credential stuffing and password guessing. When we have got the theory done, we are then going to demonstrate how those attacks can be achieved and put some defenses into our Python-based website to stop them. There are a lot of components to authentication, and they each need thought and attention to make sure they are secure.
Account Creation: Right at the start, we have got account creation, a customer coming to your website and creating an account. In this step, we need to think about how the password is initially handled. If we are setting up multi-factor authentication (MFA), then we will need to make sure that process is robust and cannot be abused in any way. This part of authentication is all about confirming someone’s identity, so we want to make sure that we have done that well. For example, we want to make sure they are the real owner of the email address and they are not trying to abuse that address in any way.
Logging in: Then we have got logging in, the part we normally associate with authentication. We have got MFA again here, and we are going to look at that a little more closely later. Here, we will want to make sure that MFA works and cannot be circumvented by the attacker. Once logged in, we usually have an access or session token used to confirm the user has logged in. Often that is a cookie stored in the browser, and we want to make sure that it is sufficiently protected. Session length matters too. How long do our session tokens last, and is that appropriate for the data on the website? A short session is often good for something like a bank, but that could harm the user experience on other websites, like social media.
Logging out: Logging out is important as well. Does the logout actually end the session or just delete the cookie and hope that no one will use it again? Then we have got credential recovery. If the user forgets their credentials, how robust is that process? Could an attacker abuse it to gain access to the account? All of this means we have got a lot of potential to have broken authentication.
Handling Passwords
Storing Passwords securily: Looking at password handling, we are thinking about confidentiality, or whether the password can be exposed in some way. Passwords can be particularly problematic, so we are going to give them some focus. They start on the client side in the browser. At that point, it is normal to have the field show asterisks instead of the password so anyone looking over your shoulder does not see it. Once it leaves the browser, we then want to be sure it is encrypted in transit. That means your website should be using a TLS (latest TLS versions are 1.2 and 1.3) certificate to encrypt all of the traffic on your website. It is important that everything is encrypted, not just the login page. Once that password reaches your server, you want to store it in a secure manner. So what does secure mean here? It means hashing passwords. We call this a cryptographic hash, which means an algorithm that takes a string, in this case a password, and creates a new string called a hash that represents the original. If you give the algorithm a slightly different password, then you can expect a very different hash. Hashes cannot be reversed. The word cryptographic is in there, but this is not the same as encryption and decryption. Once you have got a hash, you should not be able to use an algorithm to get the original password. The really great thing about this is that you can keep a copy of the hash and never need to keep a copy of the original text. For a password, that original text is a secret, and if we do not know what that secret is then we cannot expose it to an attacker.
For authentication, stored passwords should always be hashed. The user creates the password, and the hash is stored in the database. When they then try to log in, the password they enter is hashed and compared to the hash in the database to see if it matches. A benefit here is that staff with genuine access to the database can only see the hash, never the password. This limits the damage that a dishonest member of staff might be able to achieve. This forms part of a layered defense as well. If someone was to gain access to your database, the passwords in there are largely useless to the attacker. They cannot see the actual passwords either. This brings us to an attack called credential stuffing, which starts with insecurely stored passwords. We are going to look at that very soon, but first we need to think about how strong those passwords are to start with.
Password Guessing
One attack on passwords is password guessing. This involves an attacker using brute force to guess passwords. If a user is using a weak password, then this will work well against them. So, how does an attacker start guessing passwords for an account? First, they need a username to target. Maybe they know someone has a login to your website and would like to log in as them. By doing a quick search on the internet, it is very easy to find a list of the most common passwords in use. So, if you want the 1,000 most common passwords, then you can easily get that (like this: SecLists Top Common-Credentials). Armed with a username and lots of passwords, the only thing left to do is use a tool to automate the request. And that is a very simple task, as we will soon see with BurpSuite.
The first defense for password guessing is something that we have already hinted at, which is encouraging users to use strong passwords. If they are strong, then they should not appear in the most common password list. One of the key indicators of password strength is the length of the password, although a long password does not necessarily mean it is secure. You can still choose a bad password. Other factors, like using upper and lowercase letters, numbers, and special characters, all help to add strength, but remember that these things can also impact usability. Making a password requirement too complex might deter people from creating an account in the first place.
Alright! Let us set up BurpSuite (a proxy tool) first, and then we will move to the practical implementation.
BurpSuite Setting Up
Burp Suite is a proprietary software tool developed by PortSwigger for security assessment and penetration testing of web applications. Initially created in 2003–2006 by Dafydd Stuttard to automate his own security testing needs, it has since become the most widely used tool in its field, trusted by professional penetration testers and bug bounty hunters worldwide. The software functions as an intercepting proxy, sitting between a user’s browser and a target web application to capture, analyze, modify, and forward HTTP/HTTPS requests and responses. This allows security professionals to inspect traffic in detail, identify vulnerabilities, and test for potential attack vectors. We will be using it for this purpose to intercept the user-entered credentials and, as a proxy, we will capture, analyze, and modify the HTTP(s) requests and responses.
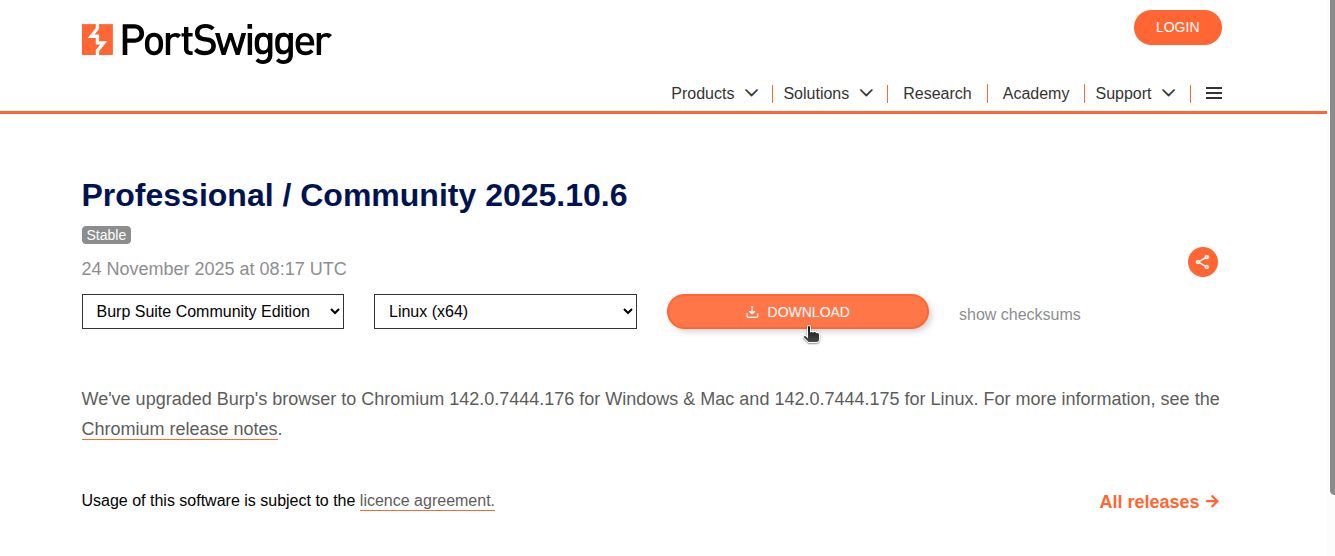
Download BurpSuite Community Edition from the official site: https://portswigger.net/burp/documentation/desktop/getting-started/download-and-install
Note: If you are on Windows, please ask ChatGPT or just search on Google and you will find the steps for how to download and setup Burp on Windows. Below I am explaining the steps only for Linux (Debian‑based distros).
It is available for both Windows and Linux.
If you are on Linux, you will see the burp.sh file. Download it and then run chmod +x burpfile.sh, and then install it by typing ./burpfile.sh in terminal.
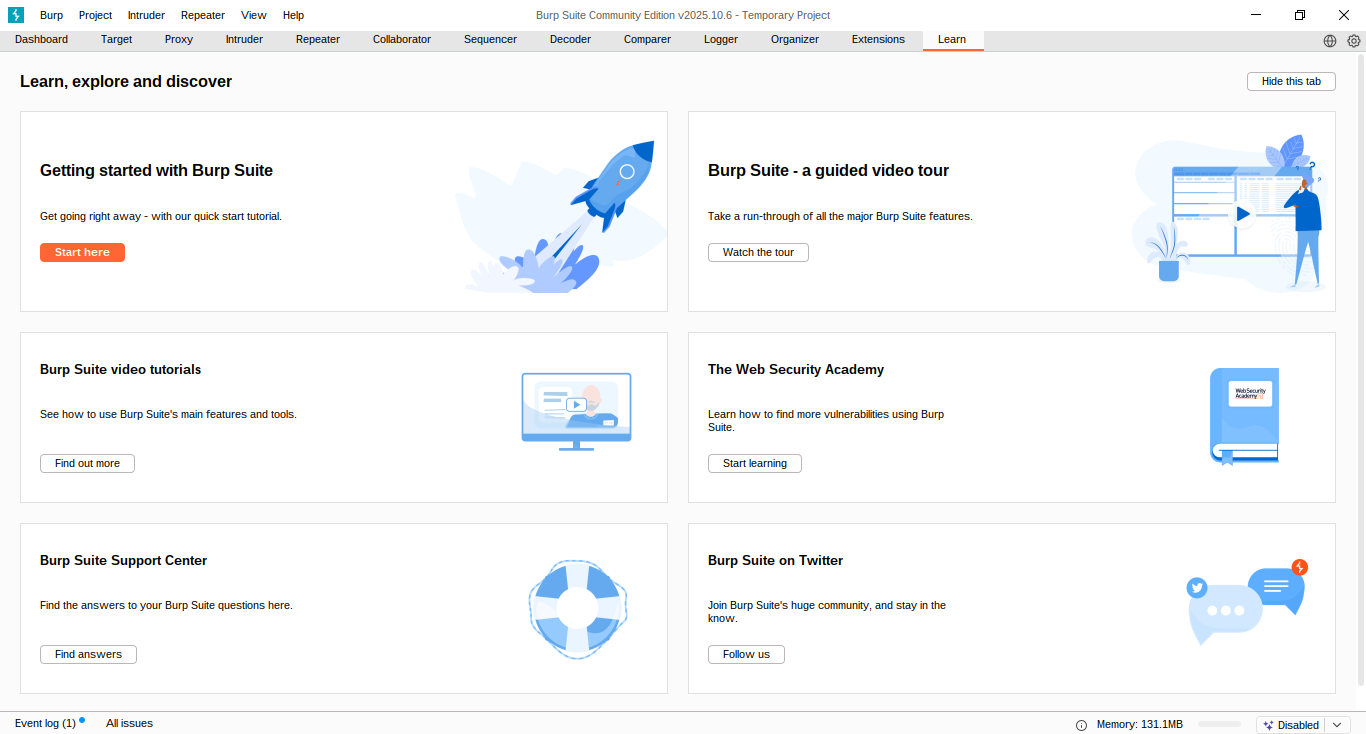
Once installed, click to open it and then click next, and select temporary project. Then click next, start burp, and then you will see this page.
 BurpSuite is a really tremendous and awesome tool that works as an interceptor between a client browser and a web server. Now here we are not going to learn everything about Burp because it is a really big tool and we cannot cover everything. So we will just look into the features that we will be using in this course.
go to the “proxy” tab, click on “open browser” which is burp built-in browser (chromium) and then this time we will run our local django code which run on 127.0.0.1:8000/login address and put this in the burp built-in browser so we can intercept it easily through burpsuite. You have to turn ON the “interception” later during demo.

Password Guessing [Demo]
In this demo, we are going to use Burp Suite to highlight how an attacker might perform a password guessing attack. This is a common problem you might face and certainly something you will want to defend against. To fix this, we are going to make sure our Timesheet website enforces strong passwords for its users. That should limit the impact of a password guessing attack. We are starting on the user registration page where we create users.
http://127.0.0.1:8000/createUser
We will enter a username and email address. If the email address is important, then we should make sure we have some functionality that proves the user does indeed own that email address. Then we enter the password, which is a password field, so we cannot see it. That is good. The password we are using is admin. It is all lowercase, five characters long, and has no special characters.

Now Think Like An Atttacker
Suppose there is a user named “admin” and now we are going to try to log in as this user, but we are going to use the wrong password (why? It is because I am the hacker this time and I do not know the correct password). While doing that, our request is going through a tool known as a proxy, Burp Suite.
Turn the “intercept on” and try to log in using username admin but with the wrong password wrong123 or any value in password field.

Now you can see the request has been captured with BurpSuite:
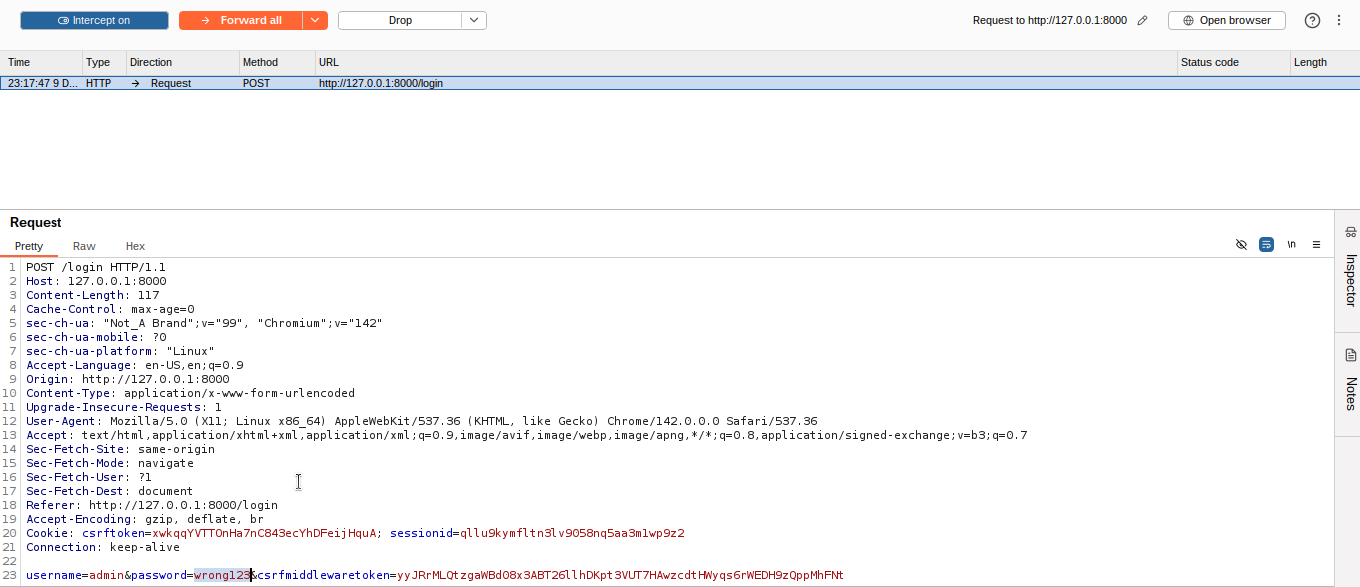 Here, you can see the login request, which is a POST to the login endpoint. In there, we can see the username and password that we are logging in with, which is
 admin:wrong123, and the response to our request.
Now right‑click on the HTTP request and send it to “Intruder”.
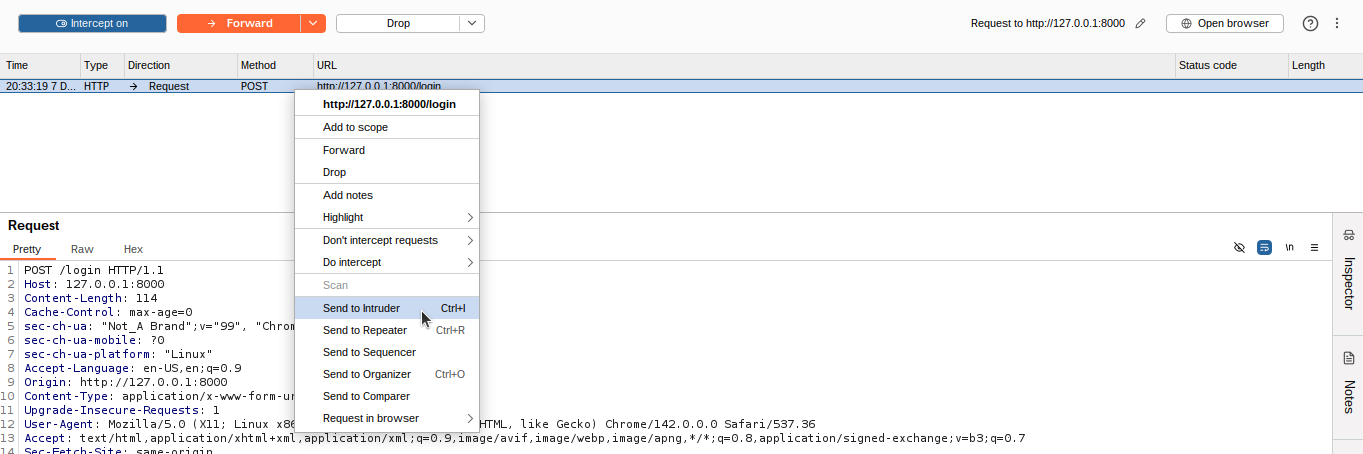 Go to the Intruder tab, and then here we will modify the HTTP request and brute‑force with the password combinations and then forward it.
As an attacker, we will be brute‑forcing some password combinations to find the exact password, and I used the password combinations list during the brute force attack.
password
123456
12345678
1234
qwerty
696969
abc123
admin
mustang
michael
shadow
master
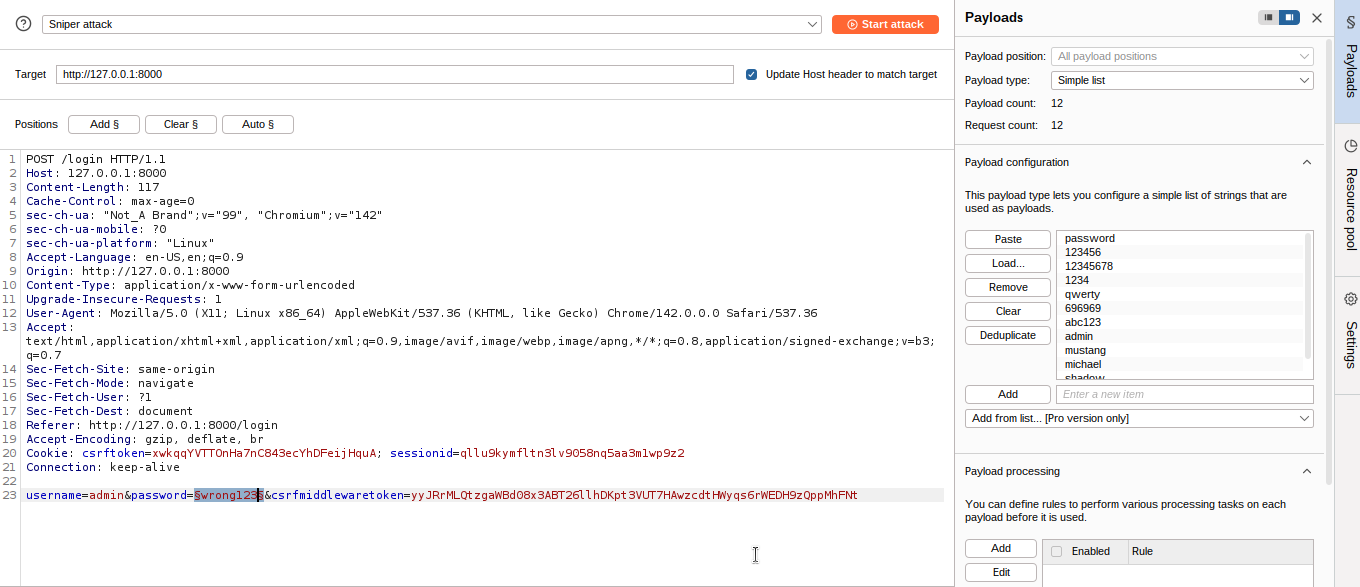 We can see that Burp has made some selections for us that we are going to clear, and then we will set only the password as a selection. This tells Burp we are going to use this position in the request to insert new values. On the Payloads tab, we are going to paste a list of common passwords and then click on “start attack”.
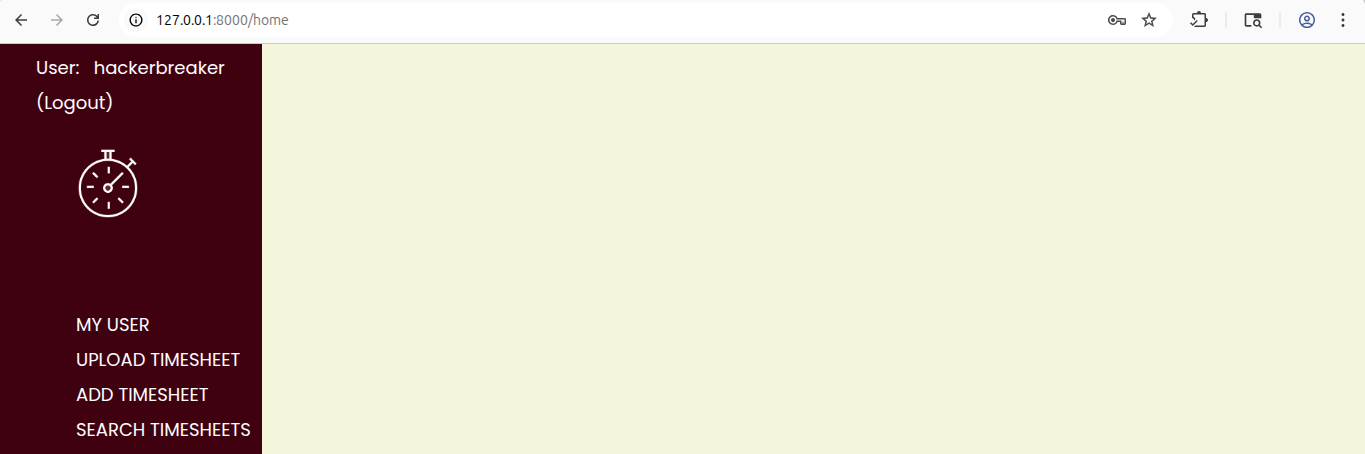
 This is the free version of Burp, which is intentionally slow, so we are not going to use a lot of passwords. This could, however, easily handle thousands of passwords if we wanted. We start the attack, and Burp starts making login requests for us. We can see that each payload is a password guess, and clicking on one shows the request used along with the password. Scrolling down the list, we see that one of the requests has returned an HTTP 302 status instead of a 200. The 302 response is telling the browser to redirect to another web page. That page is /home, so we successfully logged in.
 That means we have managed to guess the password for that user, which is
 admin. This means we have allowed users to have very simple passwords, and that is a problem.
Here is the video demo. Please watch it if anything is unclear. The video is uploaded to Mega Drive. [Click here] to watch - burpsuite demo. and Finally we successfully login.
How do we fix that? [Defense Time]
Well, in Django there is some functionality to help. So let us add some code to do just that. Here we have got a form, and it asks for the new user details, but it does not do much with the data that it gets. We will add an import.
timesheet » website » forms » CreateUserForm.py
from django.contrib.auth.password_validation import validate_password
and the method.
    def clean_password(self):
        password = self.cleaned_data.get('password')
        try:
            validate_password(password, self)
        except forms.ValidationError as error:
            self.add_error('password', error)
        return password
The method name means Django will automatically call this method to process the field named password. We are getting the password value, then giving it to a method called validate_password. If it is valid, we will return the password; otherwise, we will catch an exception and use any errors. This does not tell us a lot about what is going on, though.
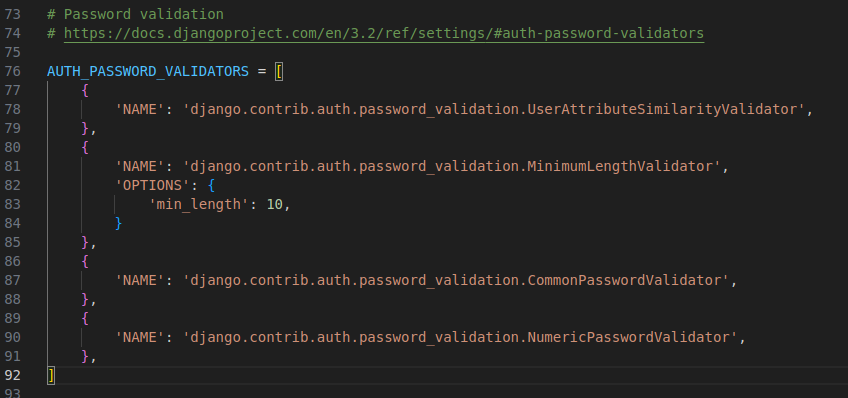
A quick look at the settings file shows us what the validate_password method is using. We can see the AUTH_PASSWORD_VALIDATORS, which specify how we validate passwords.
Look at the settings.py file.
AUTH_PASSWORD_VALIDATORS = [
    {
        'NAME': 'django.contrib.auth.password_validation.UserAttributeSimilarityValidator',
    },
    {
        'NAME': 'django.contrib.auth.password_validation.MinimumLengthValidator',
        'OPTIONS': {
            'min_length': 10,
        }
    },
    {
        'NAME': 'django.contrib.auth.password_validation.CommonPasswordValidator',
    },
    {
        'NAME': 'django.contrib.auth.password_validation.NumericPasswordValidator',
    },
]
The first is UserAttributesSimilarityValidator, which makes sure the password is not too similar to the other user attributes. Then we have got MinimumLengthValidator, which we have set so that any password has to be at least 10 characters long. CommonPasswordValidator is going to check against a list of 20,000 commonly used passwords to make sure the chosen password is not in there.
And finally, NumericPasswordValidator, which ensures the password is not entirely numeric. This is a good set of password validators and is not too aggressive in its complexity requirements.
With that in there, let us create a new user.
http://127.0.0.1:8000/createUser
and try to create new user with username hackerbreaker and with weak password asdf

Here, I tried a simple and not secure password asdf and it shows me this warning.
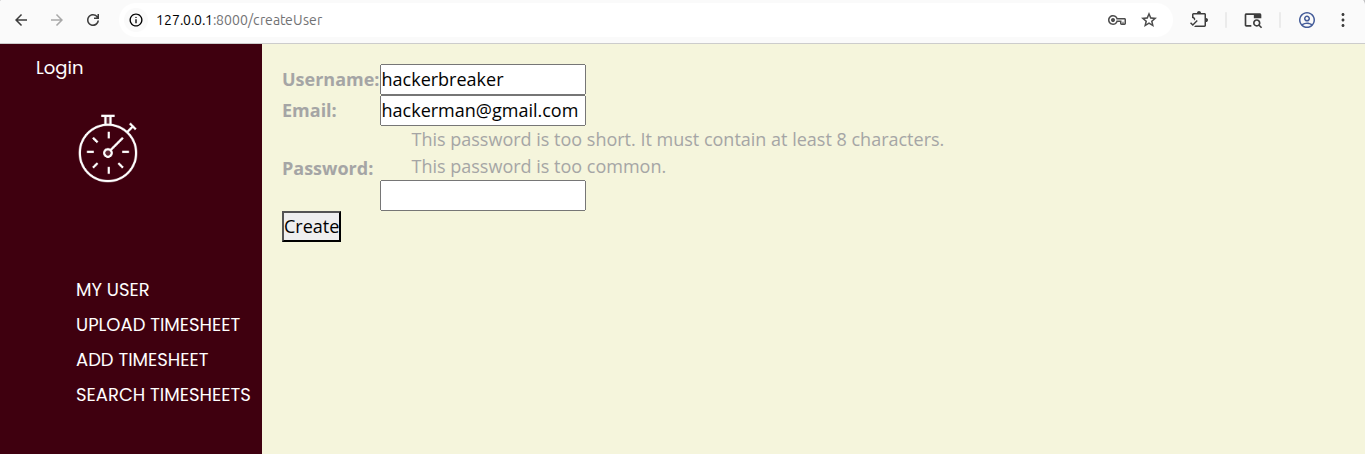 Errors come back telling us that it has failed two of the rules. It is too short, and it also appears on the common passwords list. We change the password to something a little stronger, such as
 hackerbreaker@123, and then we are fine.
Credential Stuffing
Here, an attacker targets a vulnerable website. That vulnerability could be SQL injection, which gives them access to the database, and that database contains customer credentials. Let us assume that the website did not hash passwords before putting them in the database. The attacker could easily get the usernames and passwords for all the customers who use the website. The attacker, however, already has access to that database, so what else can they do with those credentials? The answer to that is credential stuffing. They take all of those credentials from the vulnerable website, and they try to use them on a completely different website. If the users of the first website have exactly the same username and password on this website, then the attacker can access all of their data on the new website. Hashing passwords is useful if you were the vulnerable website in that scenario, protecting your customers’ passwords. But what if the attacker is attempting to use all of those credentials against your website? One great defense would be to make sure your customers use a unique password on your website, one they have never used anywhere else. Maybe some of your customers already do this, but you will have difficulty getting them all to do it. A more impactful defense is rate limiting, something in your code that detects lots of login attempts, perhaps coming from a specific IP address, and starts to block them. This slows an attacker down and might mean it is not worth the attacker’s time. Perhaps an even better defense is multi‑factor authentication, or MFA, which often comes in the form of time‑based one‑time passwords generated by a mobile phone application. MFA means you are using at least two different factors in the authentication process. Those factors are something you know, such as a password, something you have, such as your mobile phone with an app that generates passwords, or something you are, such as a fingerprint. By using a password and another factor, you can effectively stop credential stuffing from working.
Credential Stuffing [Demo]
In this demo, we are going to use Burp Suite again, this time to highlight how an attacker might perform credential stuffing. We are going to add rate limiting to the website, which will block too many attempts to log in. This is useful against both password guessing and credential stuffing. We are going back to Burp Suite’s Intruder, we will clear our positions and add username and password as positions to place text in. Then we choose “Cluster Bomb Attack” as the attack type. In Payloads, we have Payload Set 1 and paste in a list of usernames that we have stolen from a vulnerable website. For Payload Set 2, we paste in a list of passwords that we know match the usernames. It is important that the two lists are in order, so the first password matches the first username and so on.
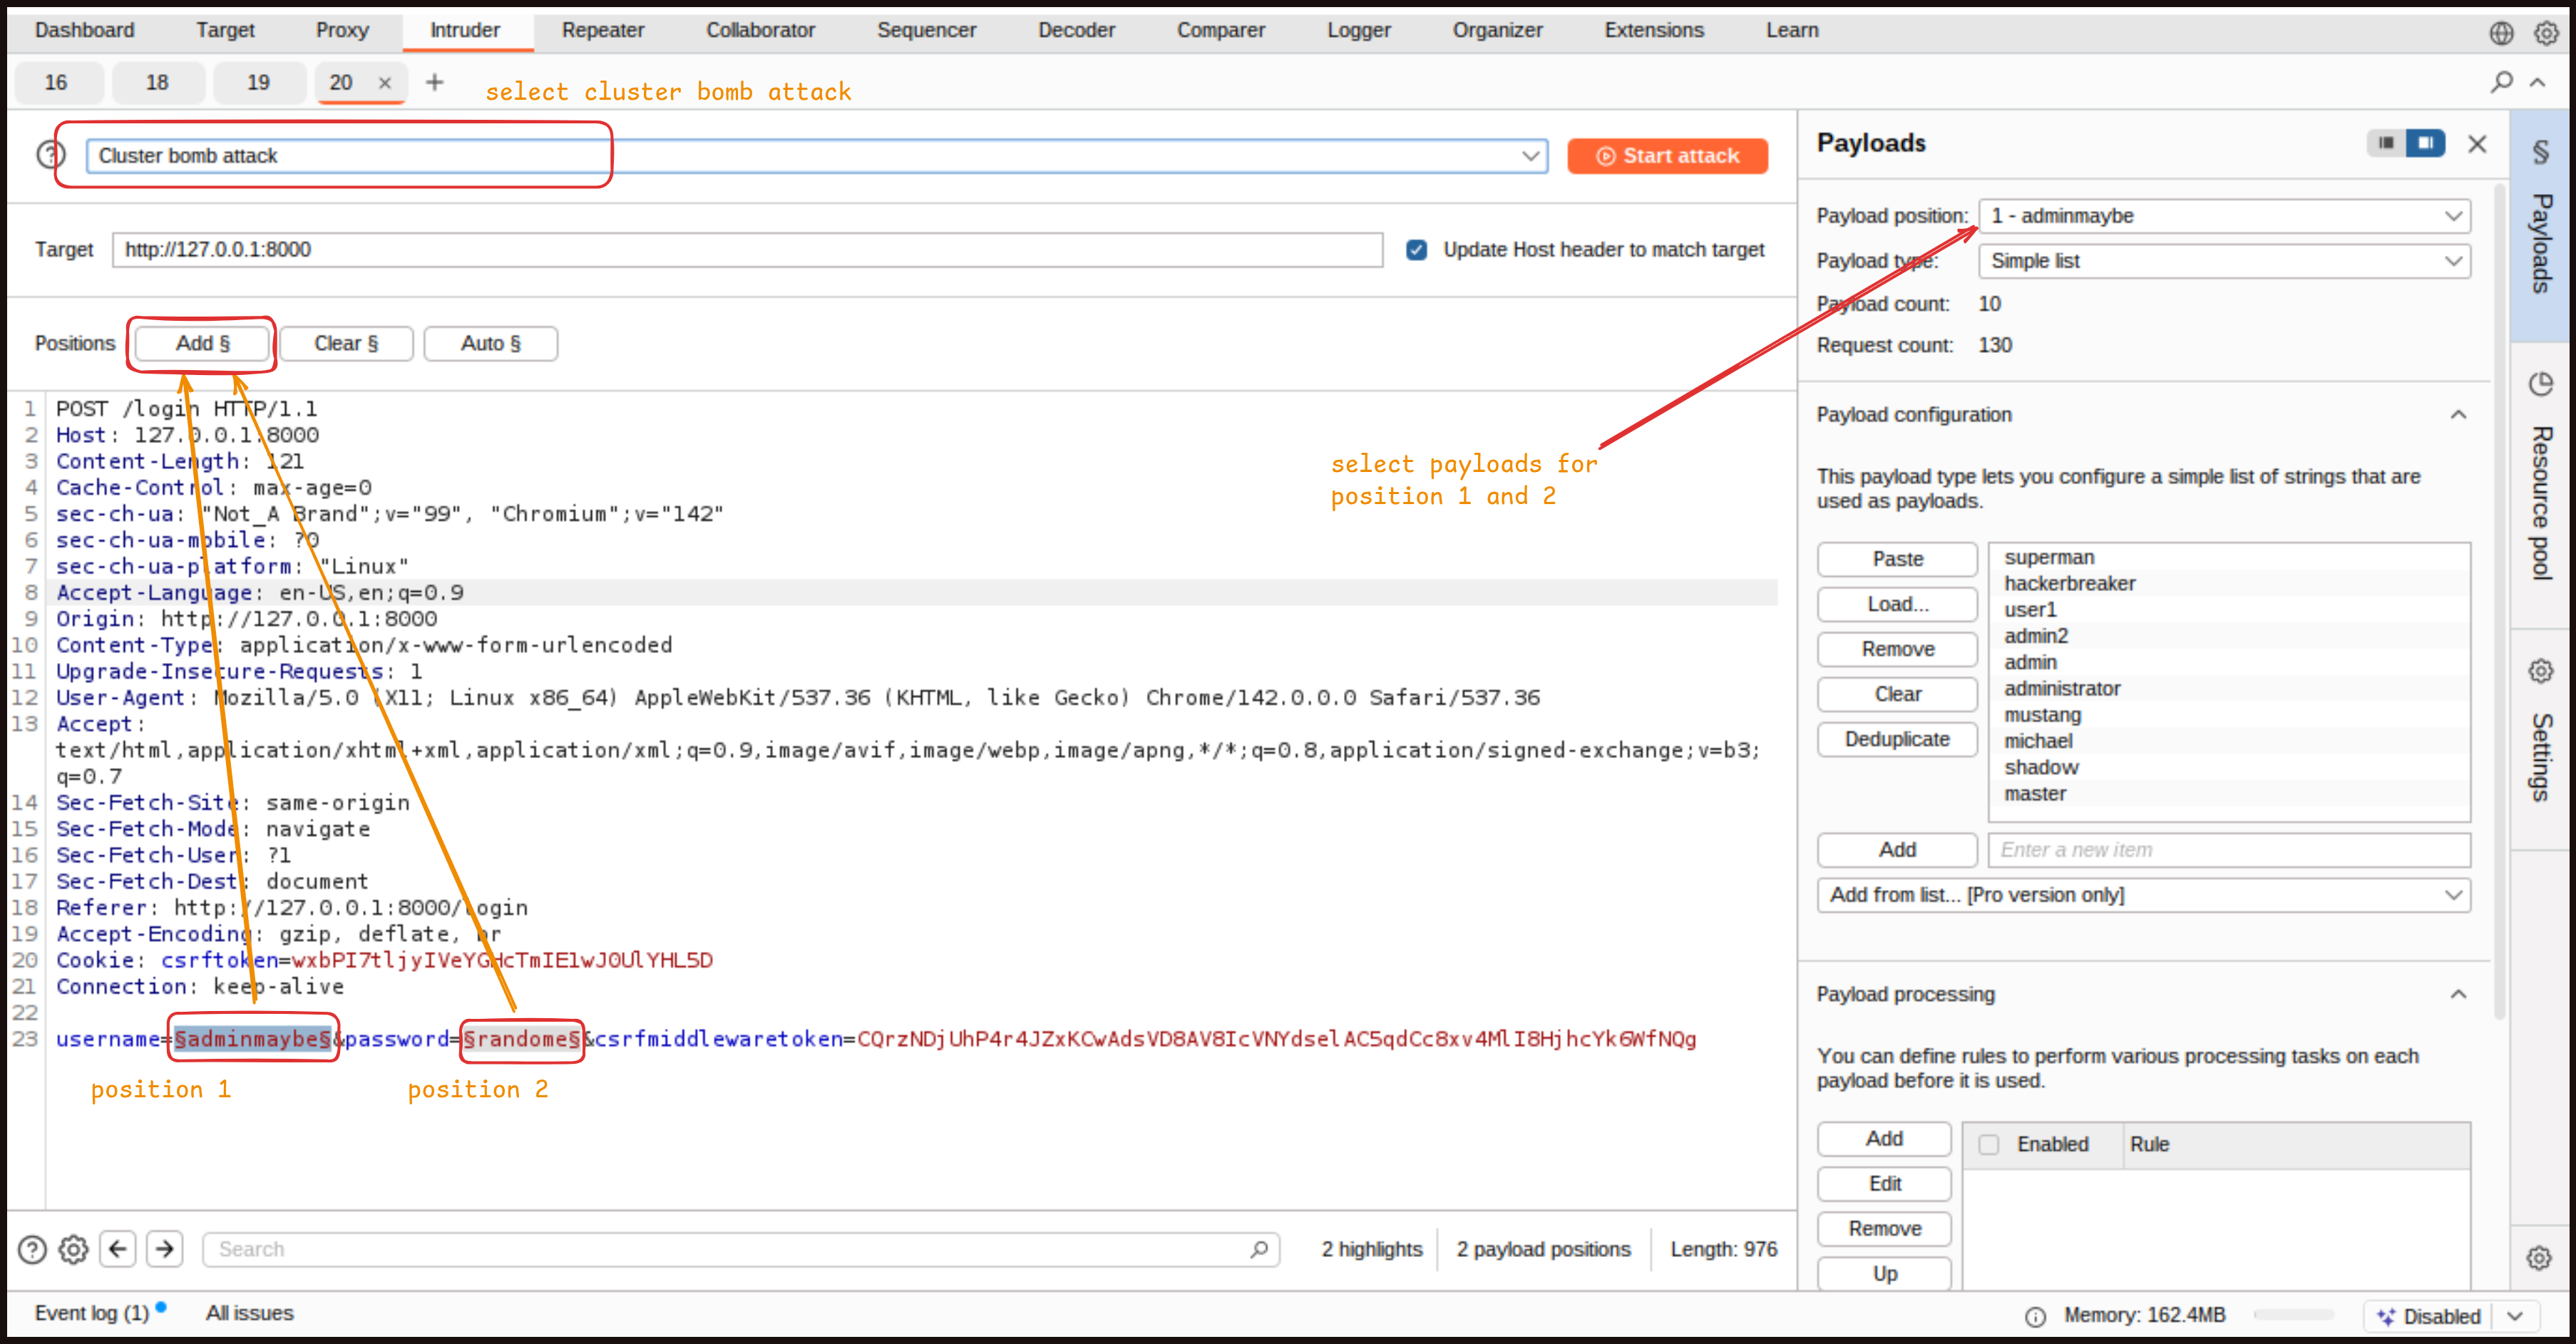
Add this payloads list in the usernames position.
superman
hackerbreaker
user1
admin2
admin
administrator
mustang
michael
shadow
master
Add this payloads list in the passwords position
password
123456
pass123
12345678
hackerbreaker@123
qwerty
696969
abc123
admin
mustang
michael
shadow
master
Running the attack, we can see a couple of 302 status codes that tell us that we’re successful.
 Again, this would be done at scale in a real attack, using thousands of usernames and passwords from vulnerable websites. The attacker would soon know which set of credentials worked here. We have mentioned that one of the defenses to help you is rate limiting, so let us add some.
How do we fix that? [Defense Time]
First, we add django‑axes using pip.
pip install django-axes
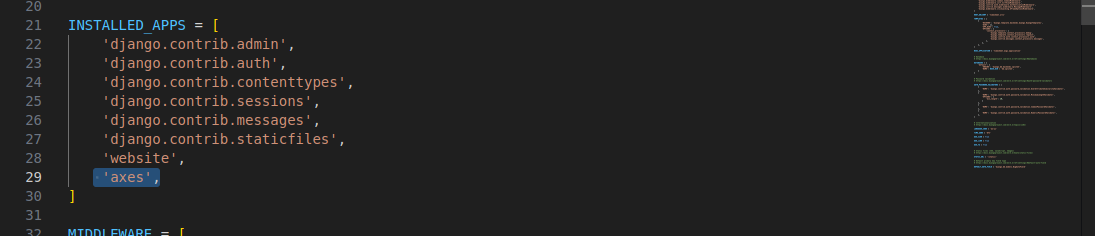
 Now, we go to our settings.py file and add axes as an installed app, simply
 axes.
We create a backends section and add axes.backends.AxesBackend, along with django.contrib.auth.backends.ModelBackend, which is the default authentication backend.
add the following after Middleware [] in setting.py
AUTHENTICATION_BACKENDS = [
    'axes.backends.AxesBackend',
    'django.contrib.auth.backends.ModelBackend',
]
We also add it as middleware with axes.middleware.AxesMiddleware.
'axes.middleware.AxesMiddleware',
One of our settings is going to use timedelta, so we will import that at the top.
from datetime import timedelta
Now the details that control it. setting.py
#Axes settings
AXES_FAILURE_LIMIT=5
AXES_COOLOFF_TIME = timedelta(minutes=10)
AXES_LOCKOUT_TEMPLATE = 'website/rateLimit.html'
First, we set the failure limit, which defines how many attempts a user gets before being locked out. Five tries is a reasonable number. Then we decide how long the lockout should last once a user reaches five incorrect password attempts, in our case, 10 minutes. This system checks both the user account being targeted and the IP address making the requests.
Axes requires database changes, so we run the migrations with the command
python3 manage.py migrate
The final step is adding the template page that appears when the rate limit is reached. We’ve already got the path to the page, and we have placed it inside our templates directory. This is a simple page that informs the user they have hit the rate limit and their account is now temporarily locked.
create this file: timesheet » website » templates » website » rateLimit.html
{% extends "base.html" %}

{% block title %}Rate Limit Exceeded{% endblock %}

{% block content %}

You have failed to login {{failure_limit}} times <BR><BR>

Your account is now locked for {{cooloff_timedelta}} minutes.

{% endblock %}
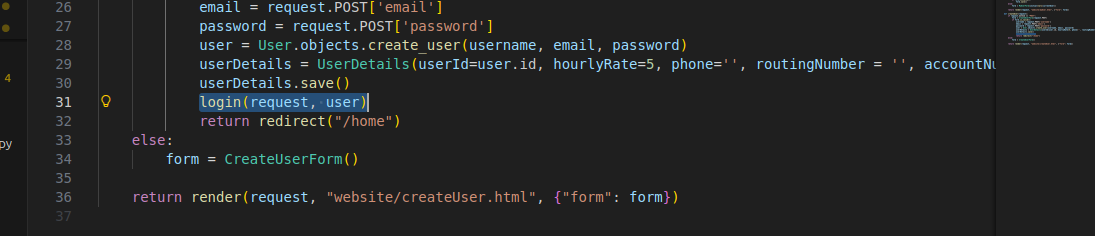
Finally, because we are using more than one authentication backend now, we need to add our original backend when we log in after first creating our user.
file: user.py
 Replace with
login(request, user, backend="django.contrib.auth.backends.ModelBackend")
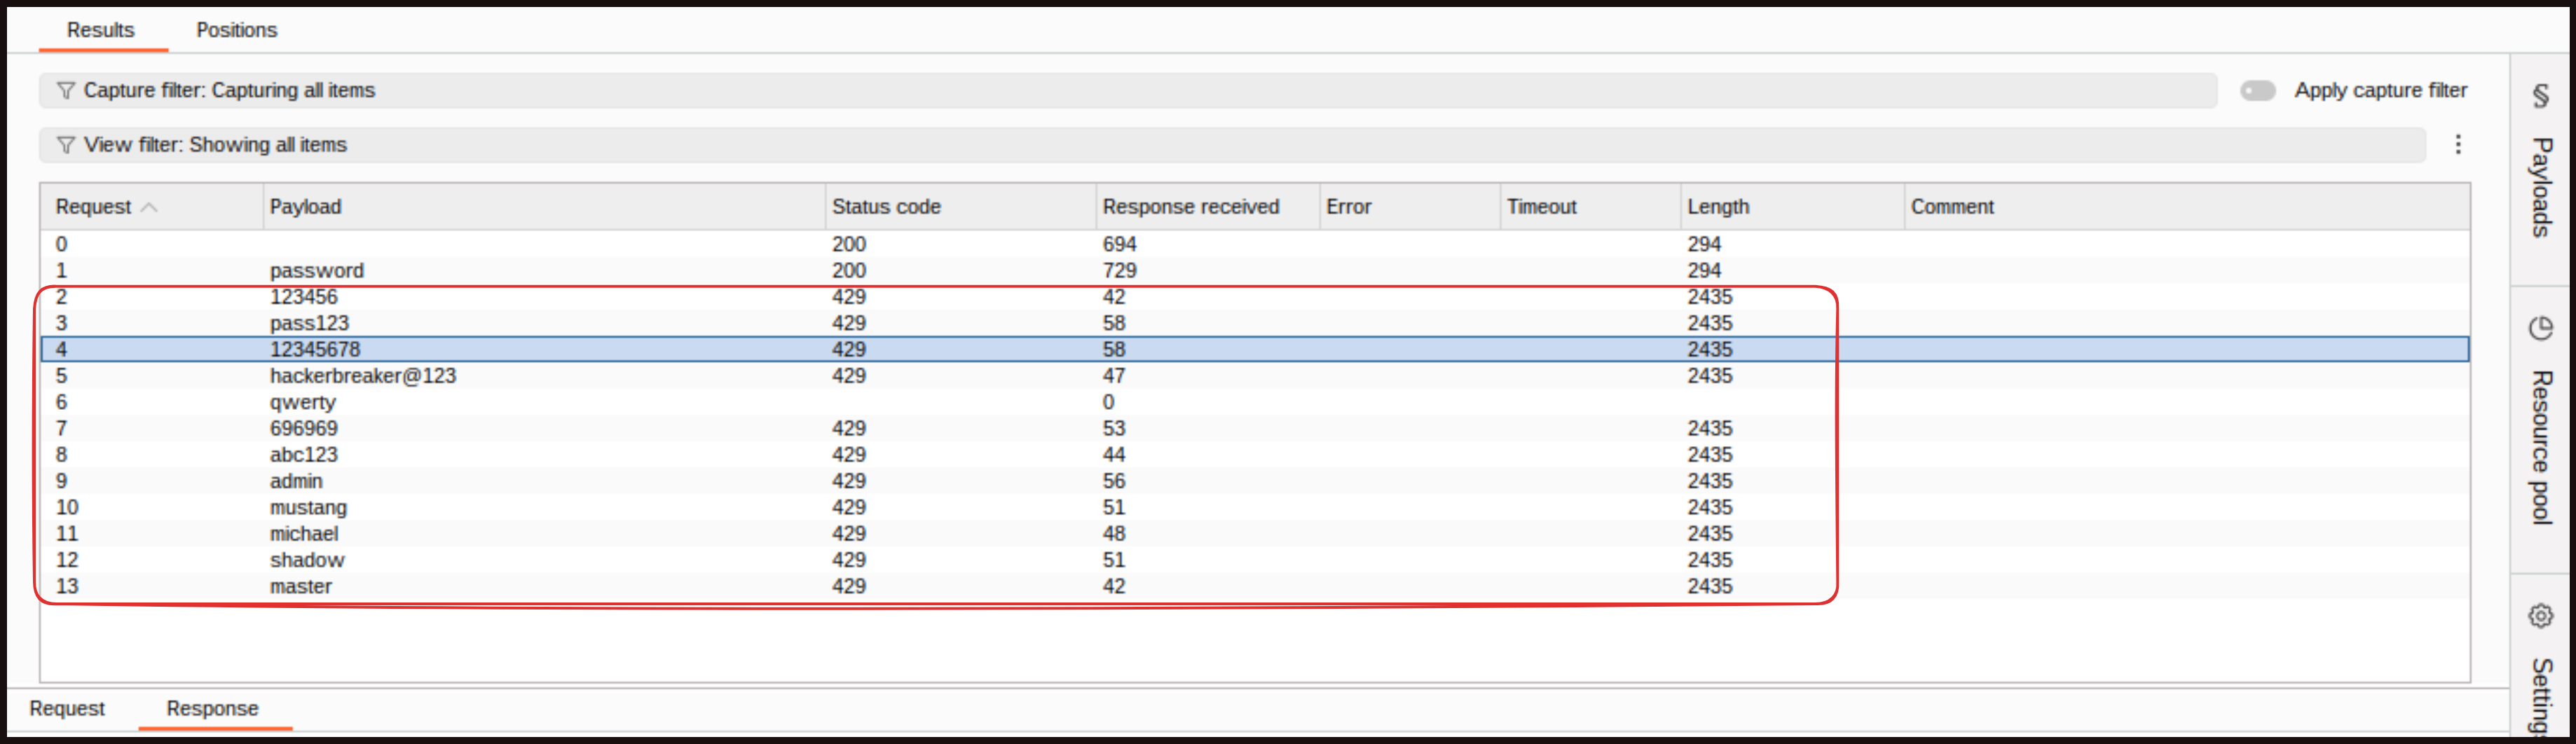
Back in Burp Suite, we try password guessing again by targeting a single user. We clear the positions, add only the password placeholder, load a list of commonly used passwords, and start the attack. This time, we see a few initial attempts go through, but by the third attempt we start getting an HTTP 429 response with the title “Too Many Requests.” This tells us the website is now throttling requests due to the rate‑limiting protection.
 Response
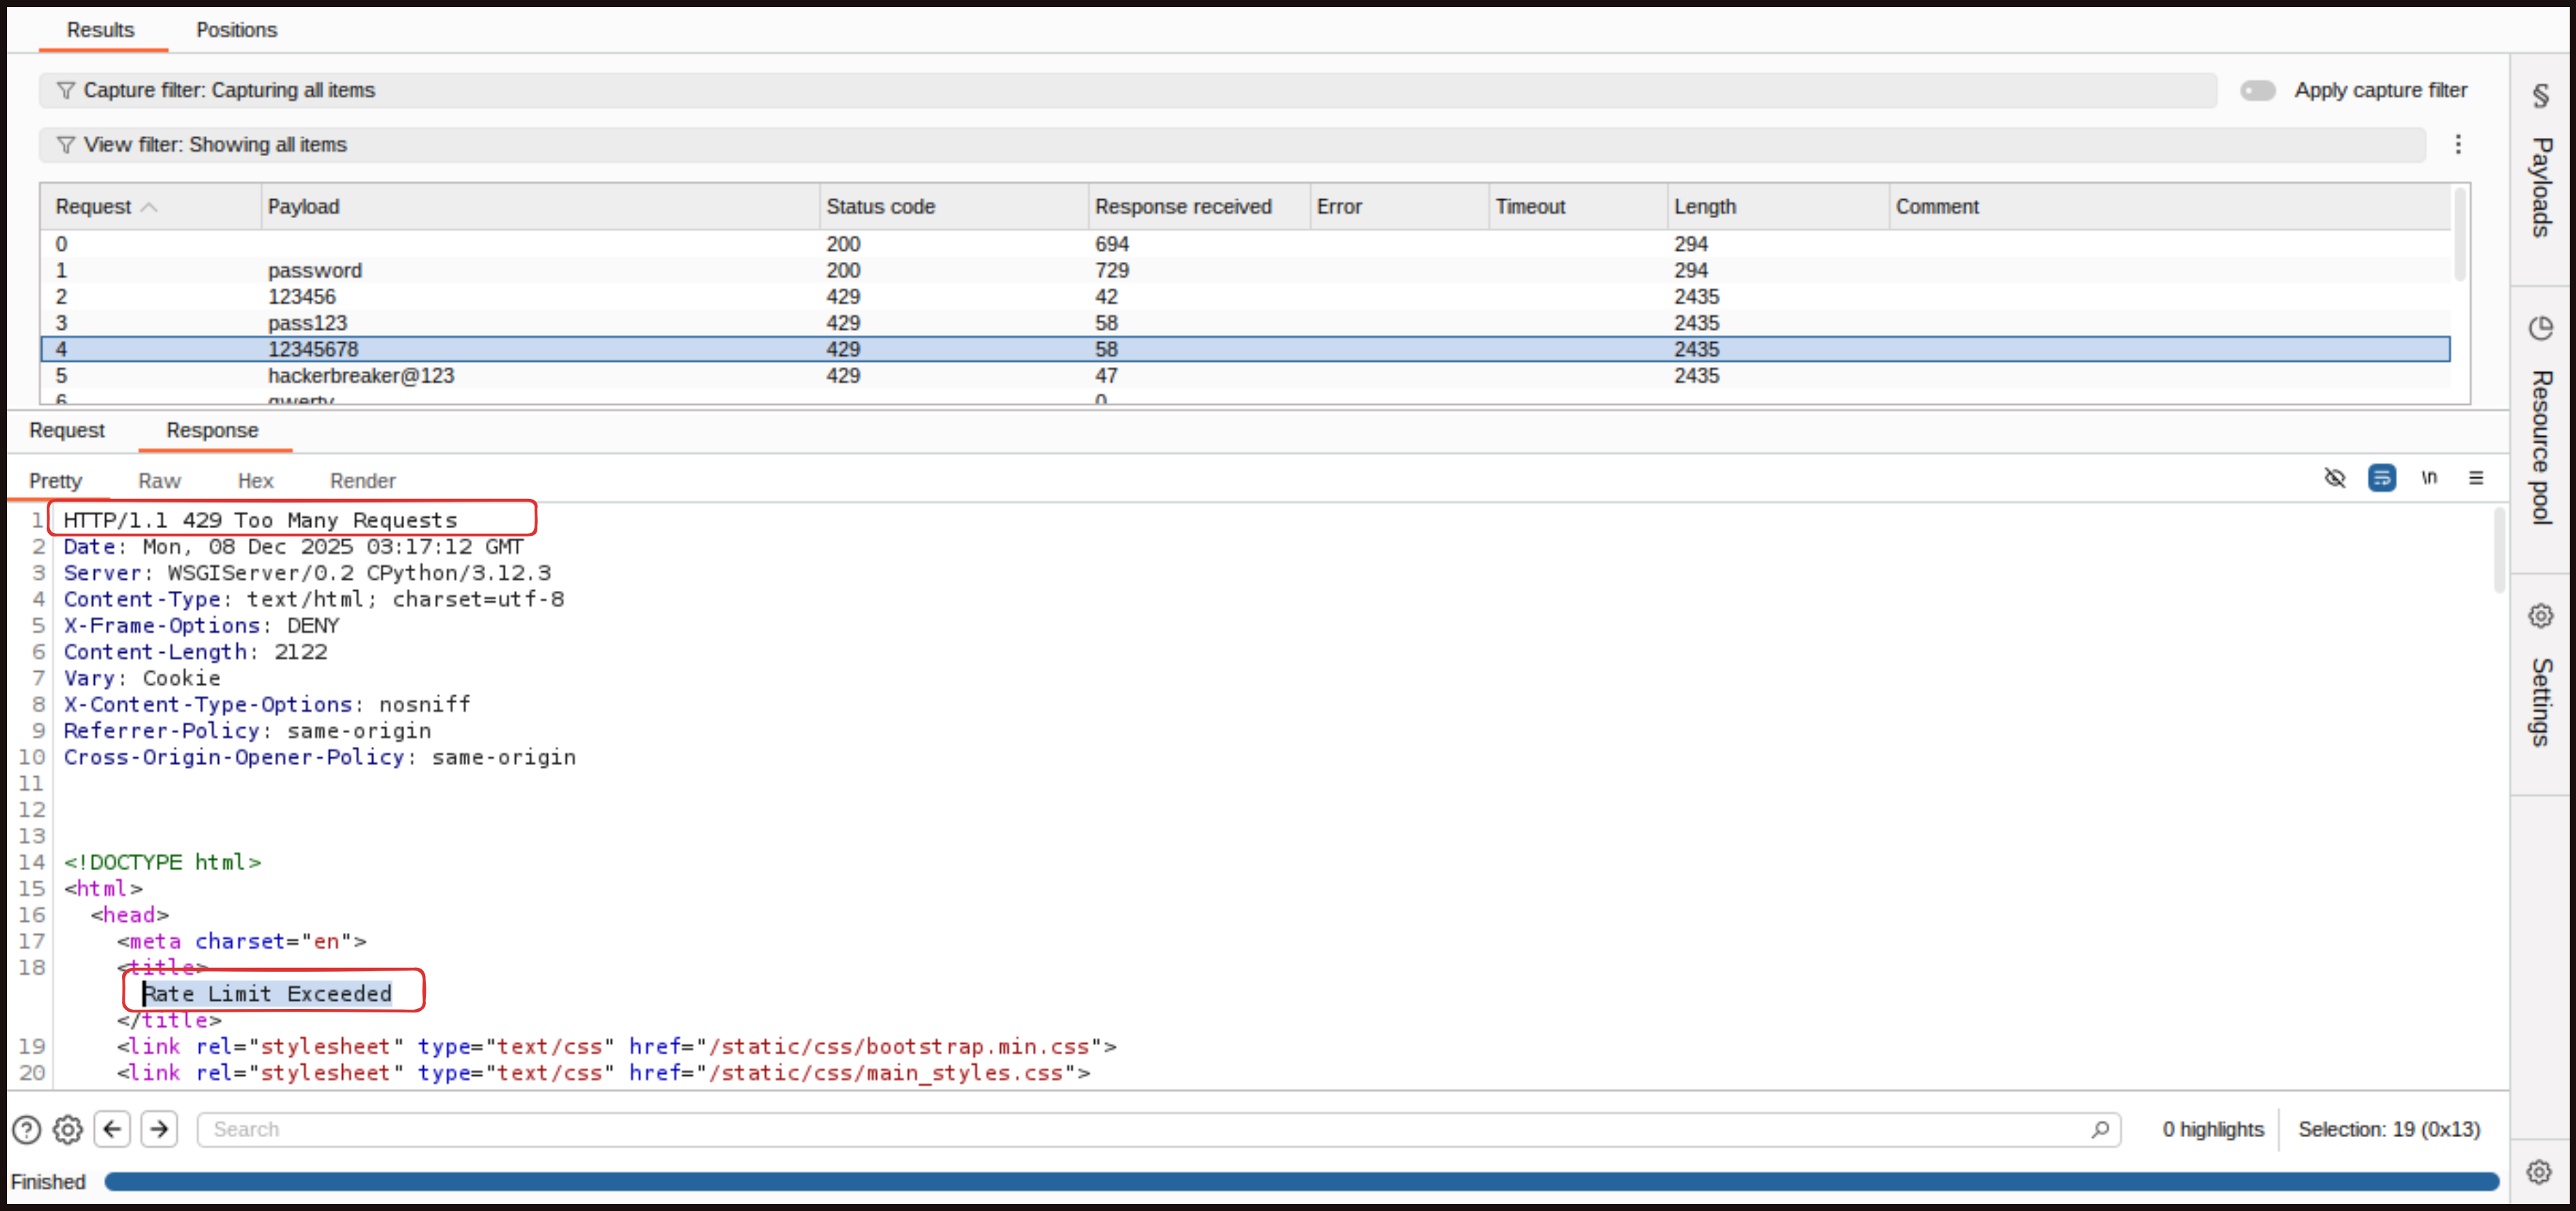 We have made too many attempts against this specific account, so we are temporarily blocked. This confirms that our password‑guessing defense is working as intended.
Note: If Burp slows down after the third or fourth attempt, do not worry. This happens because the rate limit we configured is now rejecting further requests. Another reason is that we are using the Burp Suite Community Edition, which is intentionally slower. With Burp Suite Professional, the attack would run much faster.
Credential Stuffing
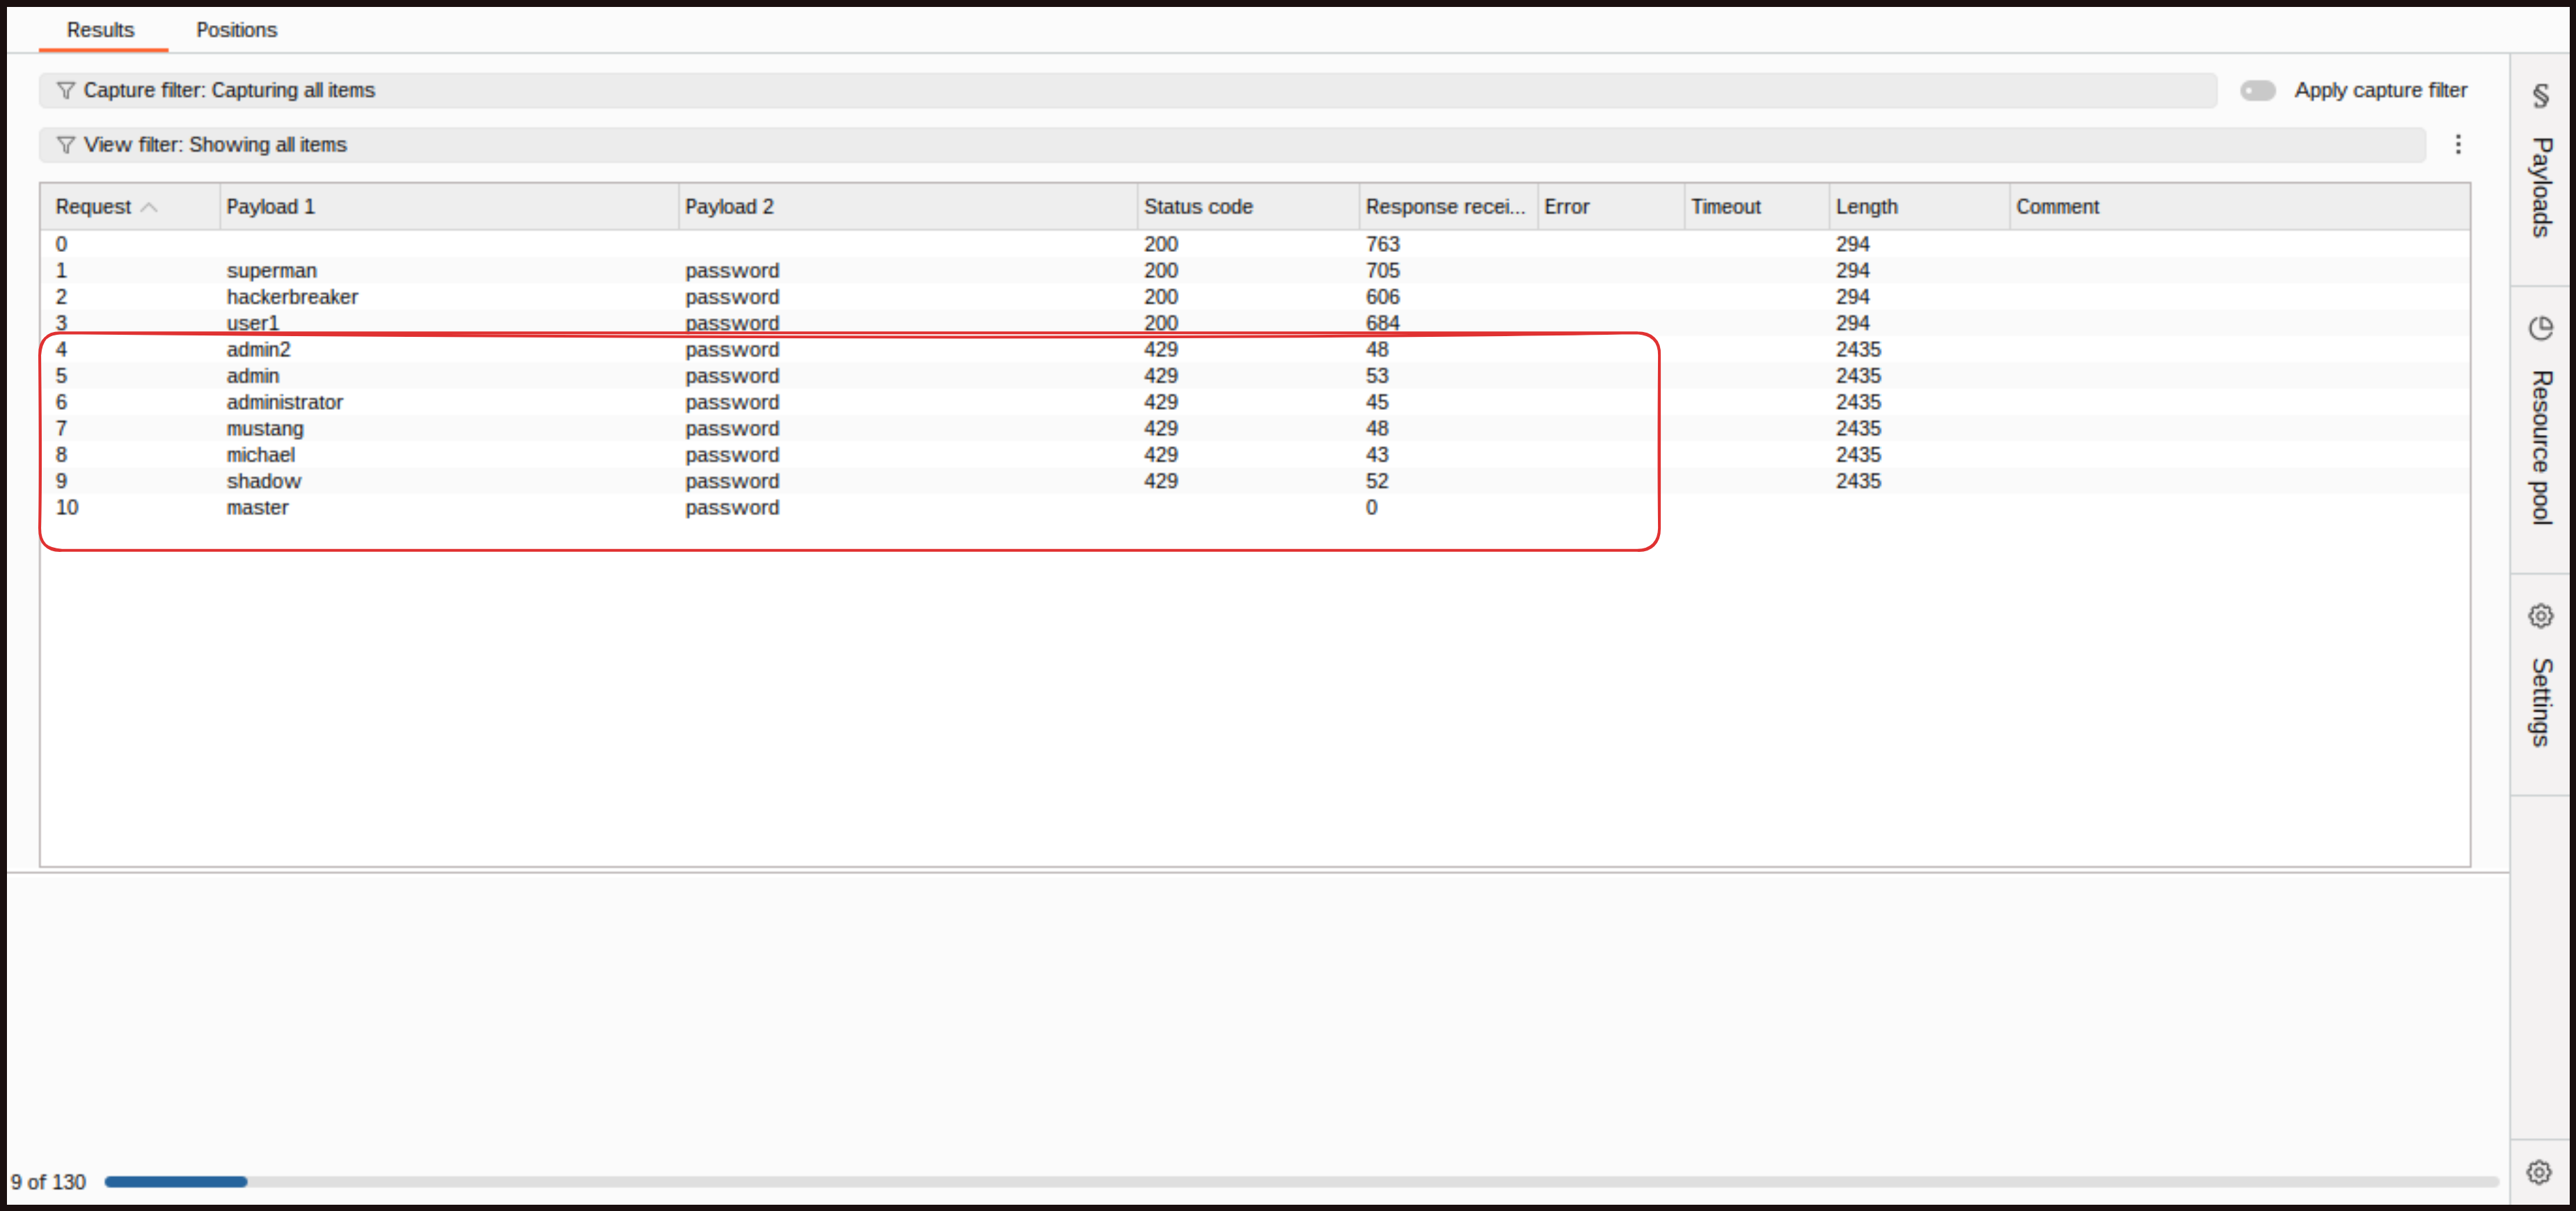
Now credential stuffing. We will take the same request, clear placeholders, add both the username and password fields, and choose the Cluster Bomb Attack. Payload 1 is usernames, so paste our stolen list of usernames in there, and for Payload 2, we are adding passwords list. Running that, we see the same pattern. On the fifth request, we start to get our login attempts rejected. This is using the IP address the requests come from to define when too many authentication attempts are being made. Our credential stuffing defense is working too.
Note: As you know, we have set a lockout time limit for 10 minutes, so wait or restart the program when attacking again.
Let’s Summarize..
We have looked at password guessing and credential stuffing attacks here, which are both common and quite easily achieved, so it is important to have some defenses in place. Those defenses have started with ensuring users have strong passwords to help defend against password guessing. The other key defense is rate limiting, which significantly slows an attacker down when they make lots of authentication requests. Limiting is applied both on individual user accounts and by IP address. This limits the effectiveness of credential stuffing. We have also briefly looked at the many aspects of authentication. There are lots of things that can go wrong, so we need to understand the workflows and tooling that we are using to make sure we have good security around authentication.
Furthermore, we can add and we must add MFA to the website so that a password alone is not enough to grant access. We can use a time based one time password (TOTP). This will work with authenticator applications such as Google Authenticator to generate 6 digit passwords that are valid for a short period of time. The website will accept those passwords, provided that the user has access to the second factor, which is the authenticator application on a mobile phone. But this is a little more challenging and does not meet our course, which is at a fundamental level, so we will try to discuss it sometime (maybe) in the future.
Alright everyone, I am hoping you have learned something new today with this post. Kindly practice all of this on your own, do not just read but implement it so you will get the best out of it. Stay tuned until next week. Thank you. If you have any questions, recommendations, or if you find any misinformation in the blog and want to report it to me, please feel free to reach out to me on LinkedIn: https://www.linkedin.com/in/aziz-u000/
Ending with this Quote: “Sometimes it is the people no one can imagine anything of who do the things no one can imagine.” — Alan Turing